# 📦 Collections
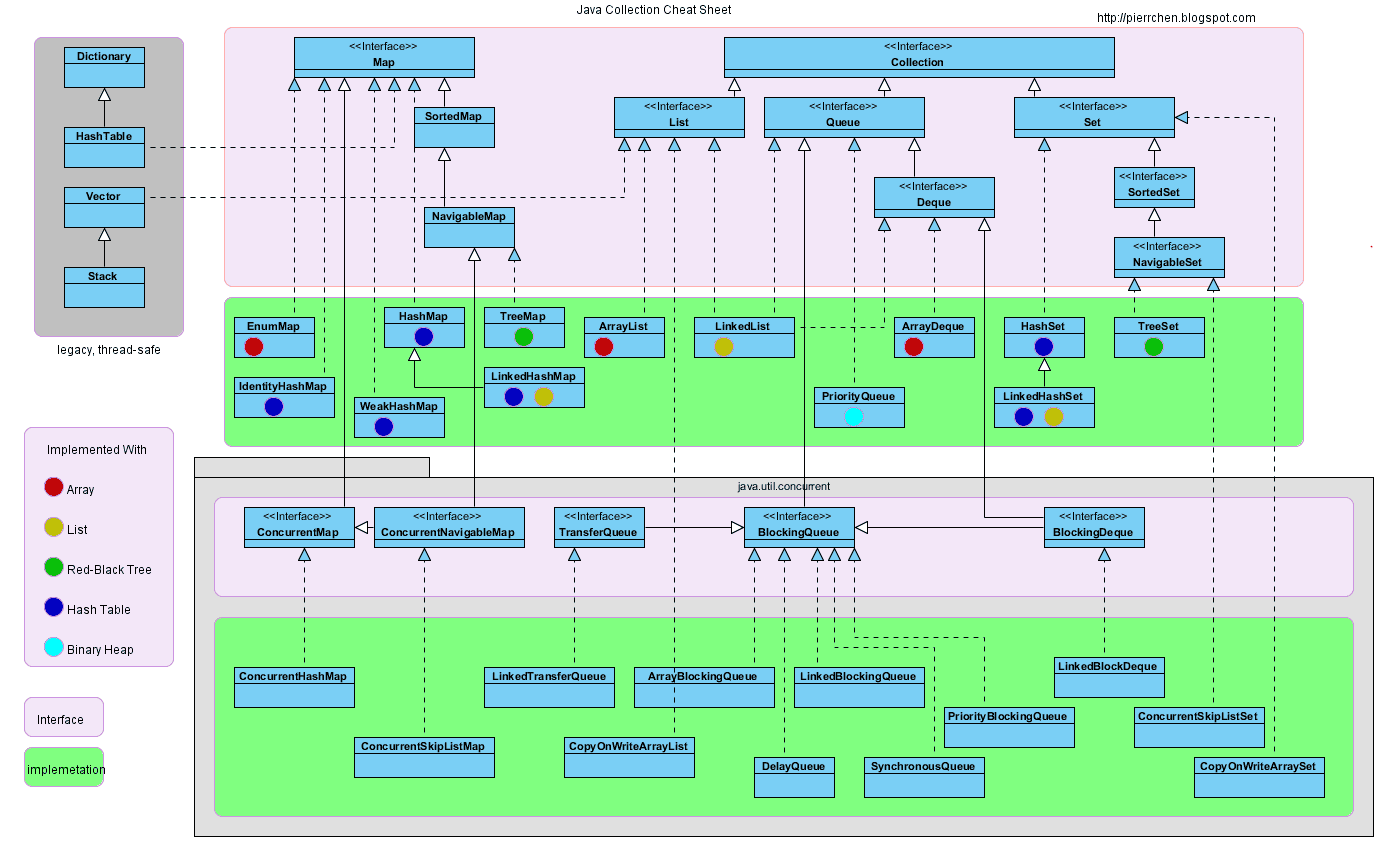
# 知识体系结构
# 介绍
容器,就是可以容纳其他Java对象的对象。Java Collections Framework(JCF) 为Java开发者提供了通用的容器,其始于JDK 1.2,优点是:
- 降低编程难度提高程序性能
- 提高API间的互操作性
- 降低学习难度
- 降低设计和实现相关API的难度
- 增加程序的重用性
Java容器里只能放对象,对于基本类型(int, long, float, double等),需要将其包装成对象类型后(Integer, Long, Float, Double等)才能放到容器里。很多时候拆包装和解包装能够自动完成。这虽然会导致额外的性能和空间开销,但简化了设计和编程。
TIP
容器主要包括 Collection 和 Map 两种,Collection 存储着对象的集合,而 Map 存储着键值对(两个对象)的映射表。
# Collection
# Set
# TreeSet
基于红黑树实现,支持有序性操作,例如根据一个范围查找元素的操作。但是查找效率不如 HashSet,HashSet 查找的时间复杂度为 O(1),TreeSet 则为 O(logN)。
# HashSet
基于哈希表实现,支持快速查找,但不支持有序性操作。并且失去了元素的插入顺序信息,也就是说使用 Iterator 遍历 HashSet 得到的结果是不确定的。
# LinkedHashSet
具有 HashSet 的查找效率,且内部使用双向链表维护元素的插入顺序。
# List
# ArrayList
基于动态数组实现,支持随机访问。
# Vector
和 ArrayList 类似,但它是线程安全的。
# LinkedList
基于双向链表实现,只能顺序访问,但是可以快速地在链表中间插入和删除元素。不仅如此,LinkedList 还可以用作栈、队列和双向队列。
# Queue
# LinkedList
可以用它来实现双向队列。
# PriorityQueue
基于堆结构实现,可以用它来实现优先队列。
# Map
# TreeMap
基于红黑树实现。
# HashMap
基于哈希表实现。
# HashTable
和 HashMap 类似,但它是线程安全的,这意味着同一时刻多个线程可以同时写入 HashTable 并且不会导致数据不一致。它是遗留类,不应该去使用它。现在可以使用 ConcurrentHashMap 来支持线程安全,并且 ConcurrentHashMap 的效率会更高,因为 ConcurrentHashMap 引入了分段锁。
# LinkedHashMap
使用双向链表来维护元素的顺序,顺序为插入顺序或者最近最少使用(LRU)顺序。
# 参考内容
- CarpenterLee/JCFInternals https://github.com/CarpenterLee/JCFInternals (opens new window)
- https://pdai.tech/md/java/collection/java-collection-all.html
# 源码解析
TIP
对Collection - ArrayList、LinkedList、Stack、PriorityQueue等进行源码解析
# ArrayList
# 概述
ArrayList 实现了 List 接口,是顺序容器,即元素存放的数据与放进去的顺序相同,允许放入 null 元素,底层通过数组实现。除该类未实现同步外,其余跟 Vector 大致相同。
每个 ArrayList 都有一个容量(capacity),表示底层数组的实际大小,容器内存储元素的个数不能多于当前容量。当向容器中添加元素时,如果容量不足,容器会自动增大底层数组的大小。
前面已经提过,Java泛型只是编译器提供的语法糖,所以这里的数组是一个 Object 数组,以便能够容纳任何类型的对象。

size(), isEmpty(), get(), set() 方法均能在常数时间内完成,add() 方法的时间开销跟插入位置有关,addAll() 方法的时间开销跟添加元素的个数成正比。其余方法大都是线性时间。
为追求效率,ArrayList没有实现 同步(synchronized) ,如果需要多个线程并发访问,用户可以手动同步,也可使用Vector替代。
TIP
Q:"ArrayList 没有实现 同步(synchronized)" 是什么意思?
A:
Java 中的 ArrayList 类并不是线程安全的。在多线程环境下,如果不采取额外的同步措施,直接对 ArrayList 进行操作可能会导致数据不一致或其他并发问题。
具体来说,ArrayList 的内部实现并没有包含任何形式的线程同步机制。例如,当你有一个 ArrayList 实例,并且多个线程同时对其进行 add、remove 或 get 等操作时,如果不加任何同步措施,就可能出现以下情况:
- 数据不一致:一个线程在修改列表(如添加或删除元素)的同时,另一个线程也在尝试读取或修改同一个列表。这可能导致读取到中间状态的数据或产生其他不可预测的结果。
- 数据丢失:如果一个线程正在对列表进行结构性修改(如添加或删除元素),而另一个线程同时尝试访问该列表,可能会导致数据丢失或异常。
为了避免这些问题,你可以在访问 ArrayList 时使用 synchronized 关键字来确保线程安全,或者考虑使用线程安全的列表实现,如 Vector 或 Collections.synchronizedList()。但请注意,使用 synchronized 可能会降低性能,因为它会阻止多个线程同时访问列表。
在现代Java开发中,更常见的做法是使用并发集合,如 CopyOnWriteArrayList,它提供了线程安全的读操作,并且通过复制底层数组来实现写操作的线程安全。这种列表适合读多写少的场景。
# ArrayList的实现
# 底层数据结构
	/**
     * The array buffer into which the elements of the ArrayList are stored.
     * The capacity of the ArrayList is the length of this array buffer. Any
     * empty ArrayList with elementData == DEFAULTCAPACITY_EMPTY_ELEMENTDATA
     * will be expanded to DEFAULT_CAPACITY when the first element is added.
     */
    transient Object[] elementData; // non-private to simplify nested class access

    /**
     * The size of the ArrayList (the number of elements it contains).
     *
     * @serial
     */
    private int size;
2
3
4
5
6
7
8
9
10
11
12
13
14
15
2
3
4
5
6
7
8
9
10
11
12
13
14
15
elementData 是 ArrayList 实际存储元素的地方,size 记录了当前 ArrayList 存储了多少个元素。
# 构造函数
    /**
     * 默认初始容量大小
     */
    private static final int DEFAULT_CAPACITY = 10;

    private static final Object[] DEFAULTCAPACITY_EMPTY_ELEMENTDATA = {};

	/**
     * Constructs an empty list with the specified initial capacity.
     *
     * @param  initialCapacity  the initial capacity of the list
     * @throws IllegalArgumentException if the specified initial capacity
     *         is negative
     */
    public ArrayList(int initialCapacity) {
        if (initialCapacity > 0) {
            this.elementData = new Object[initialCapacity];
        } else if (initialCapacity == 0) {
            this.elementData = EMPTY_ELEMENTDATA;
        } else {
            throw new IllegalArgumentException("Illegal Capacity: "+ initialCapacity);
        }
    }

    /**
     * Constructs an empty list with an initial capacity of ten.
     * 使用初始容量10构造一个空列表(无参数构造)
     */
    public ArrayList() {
        this.elementData = DEFAULTCAPACITY_EMPTY_ELEMENTDATA;
    }

    /**
     * Constructs a list containing the elements of the specified
     * collection, in the order they are returned by the collection's
     * iterator.
     *
     * @param c the collection whose elements are to be placed into this list
     * @throws NullPointerException if the specified collection is null
     */
    public ArrayList(Collection<? extends E> c) {
        elementData = c.toArray();
        if ((size = elementData.length) != 0) {
            // c.toArray might (incorrectly) not return Object[] (see 6260652)
            if (elementData.getClass() != Object[].class)
                elementData = Arrays.copyOf(elementData, size, Object[].class);
        } else {
            // replace with empty array.
            this.elementData = EMPTY_ELEMENTDATA;
        }
    }
2
3
4
5
6
7
8
9
10
11
12
13
14
15
16
17
18
19
20
21
22
23
24
25
26
27
28
29
30
31
32
33
34
35
36
37
38
39
40
41
42
43
44
45
46
47
48
49
50
51
2
3
4
5
6
7
8
9
10
11
12
13
14
15
16
17
18
19
20
21
22
23
24
25
26
27
28
29
30
31
32
33
34
35
36
37
38
39
40
41
42
43
44
45
46
47
48
49
50
51
一共编写了三个构造函数:
- 无参构造
ArrayList(),将elementData指定为空数组,this.elementData = {} - 有参构造
ArrayList(int initialCapacity),传入初始容量大小 - 有参构造
ArrayList(Collection<? extends E> c),复制传入的集合c
细心的同学一定会发现:以无参数构造方法创建 ArrayList 时,实际上初始化赋值的是一个空数组。当真正对数组进行添加元素操作时,才真正分配容量。即向数组中添加第一个元素时,数组容量扩为 10。 下面在我们分析 ArrayList 扩容时会讲到这一点内容!
# 自动扩容
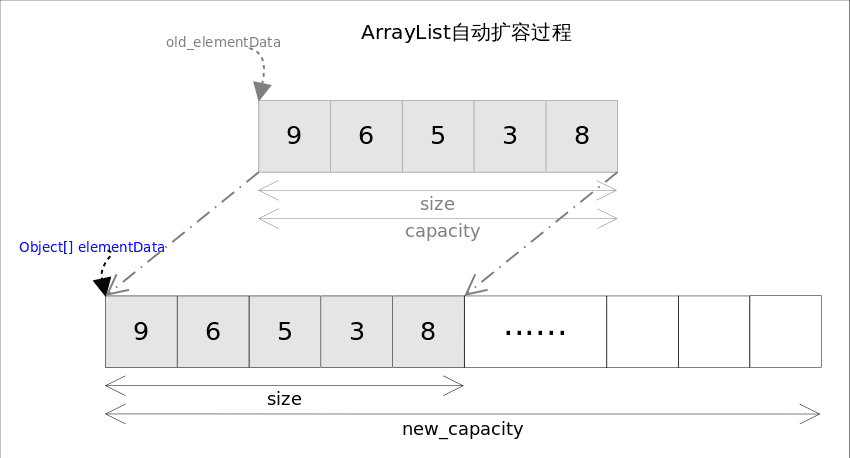
每当向数组中添加元素时,都要去检查添加后元素的个数是否会超出当前数组的长度,如果超出,数组将会进行扩容,以满足添加数据的需求。数组扩容通过一个公开的方法 ensureCapacity(int minCapacity) 来实现。
在实际添加大量元素前,我也可以使用 ensureCapacity 来手动增加 ArrayList 实例的容量,以减少递增式再分配的数量。
数组进行扩容时,会将老数组中的元素重新拷贝一份到新的数组中,每次数组容量的增长大约是其原容量的1.5倍。这种操作的代价是很高的,因此在实际使用时,我们应该尽量避免数组容量的扩张。
当我们可预知要保存的元素的多少时,要在构造 ArrayList 实例时,就指定其容量,以避免数组扩容的发生。或者根据实际需求,通过调用 ensureCapacity 方法来手动增加 ArrayList 实例的容量。
TIP
- Java 中的
length属性是针对数组说的,比如说你声明了一个数组,想知道这个数组的长度则用到了length这个属性. - Java 中的
length()方法是针对字符串说的,如果想看这个字符串的长度则用到length()这个方法. - Java 中的
size()方法是针对泛型集合说的,如果想看这个泛型有多少个元素,就调用此方法来查看!
    /**
     * Increases the capacity of this <tt>ArrayList</tt> instance, if
     * necessary, to ensure that it can hold at least the number of elements
     * specified by the minimum capacity argument.
     *
     * @param   minCapacity   the desired minimum capacity
     */
    // 这个方法 ArrayList 内部没有被调用过,所以很显然是提供给用户调用的,手动增加容量
    public void ensureCapacity(int minCapacity) {
        int minExpand = (elementData != DEFAULTCAPACITY_EMPTY_ELEMENTDATA)
            // any size if not default element table
            ? 0
            // larger than default for default empty table. It's already
            // supposed to be at default size.
            : DEFAULT_CAPACITY;

        if (minCapacity > minExpand) {
            ensureExplicitCapacity(minCapacity);
        }
    }


    // 确保内部容量达到指定的最小容量。
    private void ensureCapacityInternal(int minCapacity) {
        // 如果当前数组元素为空数组(初始情况),返回默认容量和最小容量中的较大值作为所需容量
        if (elementData == DEFAULTCAPACITY_EMPTY_ELEMENTDATA) {
            minCapacity = Math.max(DEFAULT_CAPACITY, minCapacity);
        }
        // 否则直接返回最小容量
        ensureExplicitCapacity(minCapacity);
    }

    // 判断是否需要扩容
    private void ensureExplicitCapacity(int minCapacity) {
        modCount++;

        // overflow-conscious code
        // 判断当前数组容量是否足以存储 minCapacity 个元素
        if (minCapacity - elementData.length > 0)
            grow(minCapacity);  // 调用 grow 方法进行扩容
    }

    /**
     * The maximum size of array to allocate.
     * Some VMs reserve some header words in an array.
     * Attempts to allocate larger arrays may result in
     * OutOfMemoryError: Requested array size exceeds VM limit
     */
    // 要分配的最大数组大小
    private static final int MAX_ARRAY_SIZE = Integer.MAX_VALUE - 8;

    /**
     * Increases the capacity to ensure that it can hold at least the
     * number of elements specified by the minimum capacity argument.
     *
     * @param minCapacity the desired minimum capacity
     */
    //  ArrayList 扩容的核心方法
    private void grow(int minCapacity) {
        // overflow-conscious code
        // oldCapacity 为旧容量,newCapacity 为新容量
        int oldCapacity = elementData.length;
        // 将 oldCapacity 右移一位,其效果相当于 oldCapacity /2 ,
        // 我们知道位运算的速度远远快于整除运算,整句运算式的结果就是将新容量更新为旧容量的 1.5 倍
        int newCapacity = oldCapacity + (oldCapacity >> 1);

        // 然后检查新容量是否大于最小需要容量,若还是小于最小需要容量,那么就把最小需要容量当作数组的新容量,
        if (newCapacity - minCapacity < 0)
            newCapacity = minCapacity;

        // 如果新容量大于 MAX_ARRAY_SIZE,进入(执行) `hugeCapacity()` 方法来比较 minCapacity 和 MAX_ARRAY_SIZE,
        // 如果 minCapacity 大于最大容量,则新容量则为 `Integer.MAX_VALUE`,否则,新容量大小则为 MAX_ARRAY_SIZE 即为 `Integer.MAX_VALUE - 8`
        if (newCapacity - MAX_ARRAY_SIZE > 0)
            newCapacity = hugeCapacity(minCapacity);

        // minCapacity is usually close to size, so this is a win:
        elementData = Arrays.copyOf(elementData, newCapacity);
    }

    private static int hugeCapacity(int minCapacity) {
        if (minCapacity < 0) // overflow
            throw new OutOfMemoryError();
        return (minCapacity > MAX_ARRAY_SIZE) ?
            Integer.MAX_VALUE :
            MAX_ARRAY_SIZE;
    }
2
3
4
5
6
7
8
9
10
11
12
13
14
15
16
17
18
19
20
21
22
23
24
25
26
27
28
29
30
31
32
33
34
35
36
37
38
39
40
41
42
43
44
45
46
47
48
49
50
51
52
53
54
55
56
57
58
59
60
61
62
63
64
65
66
67
68
69
70
71
72
73
74
75
76
77
78
79
80
81
82
83
84
85
86
87
2
3
4
5
6
7
8
9
10
11
12
13
14
15
16
17
18
19
20
21
22
23
24
25
26
27
28
29
30
31
32
33
34
35
36
37
38
39
40
41
42
43
44
45
46
47
48
49
50
51
52
53
54
55
56
57
58
59
60
61
62
63
64
65
66
67
68
69
70
71
72
73
74
75
76
77
78
79
80
81
82
83
84
85
86
87
# 扩容流程
分析一下扩容函数的工作流程:
- 当我们要
add进第 1 个元素到ArrayList时,elementData.length为 0 (因为还是一个空的 list),因为执行了ensureCapacityInternal()方法 ,所以minCapacity此时为 10。此时,minCapacity - elementData.length > 0成立,所以会进入grow(minCapacity)方法- 进入
grow(minCapacity)方法。oldCapacity为 0,经比较后第一个 if 判断成立,newCapacity = minCapacity(为 10)。但是第二个 if 判断不会成立,即newCapacity不比MAX_ARRAY_SIZE大,则不会进入hugeCapacity方法。数组容量为 10
- 进入
- 当
add第 2 个元素时,minCapacity为 2,此时elementData.length(容量) 在添加第一个元素后扩容成 10 了。此时,minCapacity - elementData.length > 0不成立,所以不会进入 (执行)grow(minCapacity)方法 - 添加第 3、4··· 到第 10 个元素时,依然不会执行
grow方法,数组容量都为 10 - 直到添加第 11 个元素,
minCapacity(为 11)比elementData.length(为 10)要大。进入grow方法进行扩容。newCapacity为 15,比minCapacity(为 11)大,第一个 if 判断不成立。newCapacity不比MAX_ARRAY_SIZE大,不会进入hugeCapacity方法。数组容量扩为 15
# System.arraycopy() 和 Arrays.copyOf() 方法
阅读源码的话,我们就会发现 ArrayList 中大量调用了这两个方法。比如:我们上面讲的扩容操作以及 add(int index, E element)、toArray() 等方法中都用到了该方法!
System.arraycopy()方法:
    // 我们发现 arraycopy 是一个 native 方法,接下来我们解释一下各个参数的具体意义
    /**
    *   复制数组
    * @param src 源数组
    * @param srcPos 源数组中的起始位置
    * @param dest 目标数组
    * @param destPos 目标数组中的起始位置
    * @param length 要复制的数组元素的数量
    */
    public static native void arraycopy(Object src,  int  srcPos,
                                        Object dest, int destPos,
                                        int length);
2
3
4
5
6
7
8
9
10
11
12
13
2
3
4
5
6
7
8
9
10
11
12
13
使用场景: add(int index, E element)
Arrays.copyOf()方法:
    public static int[] copyOf(int[] original, int newLength) {
        // 申请一个新的数组
        int[] copy = new int[newLength];
        // 调用System.arraycopy,将源数组中的数据进行拷贝,并返回新的数组
        System.arraycopy(original, 0, copy, 0,
                         Math.min(original.length, newLength));
        return copy;
    }
2
3
4
5
6
7
8
2
3
4
5
6
7
8
使用场景:
    /**
     以正确的顺序返回一个包含此列表中所有元素的数组(从第一个到最后一个元素); 返回的数组的运行时类型是指定数组的运行时类型。
     */
    public Object[] toArray() {
    //elementData:要复制的数组;size:要复制的长度
        return Arrays.copyOf(elementData, size);
    }
2
3
4
5
6
7
2
3
4
5
6
7
- 两者的联系与区别
- 联系
- 看两者源代码可以发现,
copyOf()内部实际调用了System.arraycopy()方法
- 看两者源代码可以发现,
- 区别
arraycopy()需要目标数组,将原数组拷贝到你自己定义的数组里或者原数组,而且可以选择拷贝的起点和长度以及放入新数组中的位置copyOf()是系统自动在内部新建一个数组,并返回该数组。
# add(), addAll()
跟C++ 的 vector 不同,ArrayList 没有 push_back() 方法,对应的方法是 add(E e) , ArrayList 也没有 insert() 方法,对应的方法是 add(int index, E e) 。这两个方法都是向容器中添加新元素,这可能会导致 capacity 不足,因此在添加元素之前,都需要进行剩余空间检查,如果需要则自动扩容。扩容操作最终是通过 grow() 方法完成的。
    /**
     * Appends the specified element to the end of this list.
     *
     * @param e element to be appended to this list
     * @return <tt>true</tt> (as specified by {@link Collection#add})
     */
    public boolean add(E e) {
        // 加元素之前,先调用 ensureCapacityInternal 方法
        ensureCapacityInternal(size + 1);  // Increments modCount!!
        // 这里看到 ArrayList 添加元素的实质就相当于为数组赋值
        elementData[size++] = e;
        return true;
    }

    /**
     * Inserts the specified element at the specified position in this
     * list. Shifts the element currently at that position (if any) and
     * any subsequent elements to the right (adds one to their indices).
     *
     * @param index index at which the specified element is to be inserted
     * @param element element to be inserted
     * @throws IndexOutOfBoundsException {@inheritDoc}
     */
    /**
     * 在此列表中的指定位置插入指定的元素。
     * 先调用 rangeCheckForAdd 对index进行界限检查;然后调用 ensureCapacityInternal 方法保证capacity足够大;
     * 再将从index开始之后的所有成员后移一个位置;将element插入index位置;最后size加1。
     */
    public void add(int index, E element) {
        rangeCheckForAdd(index);

        ensureCapacityInternal(size + 1);  // Increments modCount!!
        //elementData:源数组;index:源数组中的起始位置;elementData:目标数组;index + 1:目标数组中的起始位置; size - index:要复制的数组元素的数量;
        System.arraycopy(elementData, index, elementData, index + 1, size - index);
        elementData[index] = element;
        size++;
    }
2
3
4
5
6
7
8
9
10
11
12
13
14
15
16
17
18
19
20
21
22
23
24
25
26
27
28
29
30
31
32
33
34
35
36
37
2
3
4
5
6
7
8
9
10
11
12
13
14
15
16
17
18
19
20
21
22
23
24
25
26
27
28
29
30
31
32
33
34
35
36
37
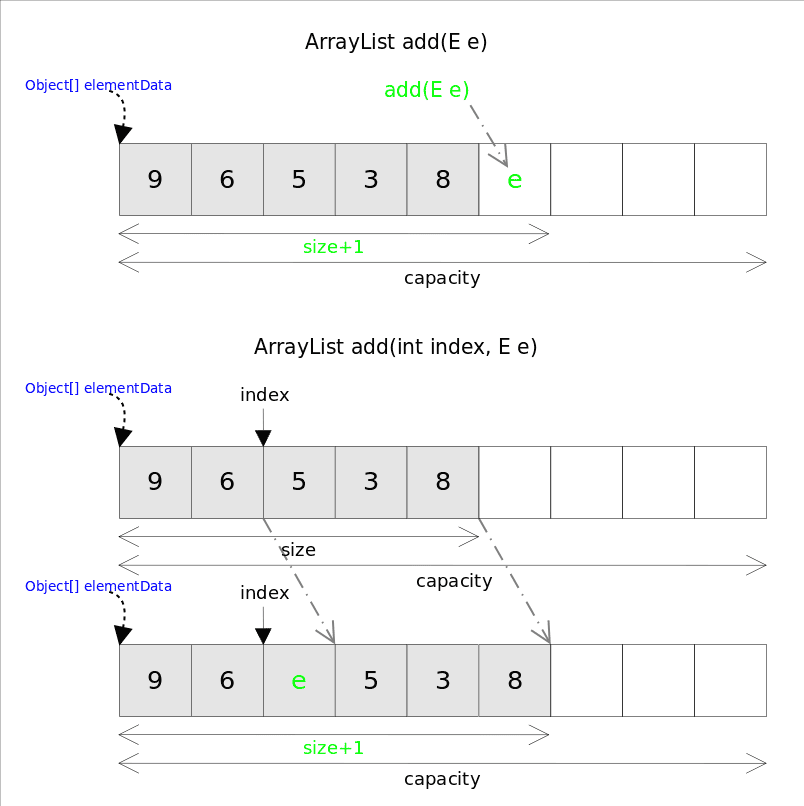
add(int index, E e)需要先对元素进行移动,然后完成插入操作,也就意味着该方法有着线性的时间复杂度。addAll()方法能够一次添加多个元素,根据位置不同也有两个版本,一个是在末尾添加的addAll(Collection<? extends E> c)方法,一个是从指定位置开始插入的addAll(int index, Collection<? extends E> c)方法。跟add()方法类似,在插入之前也需要进行空间检查,如果需要则自动扩容;如果从指定位置插入,也会存在移动元素的情况。addAll()的时间复杂度不仅跟插入元素的多少有关,也跟插入的位置相关。
    /**
     * Appends all of the elements in the specified collection to the end of
     * this list, in the order that they are returned by the
     * specified collection's Iterator.  The behavior of this operation is
     * undefined if the specified collection is modified while the operation
     * is in progress.  (This implies that the behavior of this call is
     * undefined if the specified collection is this list, and this
     * list is nonempty.)
     *
     * @param c collection containing elements to be added to this list
     * @return <tt>true</tt> if this list changed as a result of the call
     * @throws NullPointerException if the specified collection is null
     */
    public boolean addAll(Collection<? extends E> c) {
        Object[] a = c.toArray();
        int numNew = a.length;
        ensureCapacityInternal(size + numNew);  // Increments modCount
        System.arraycopy(a, 0, elementData, size, numNew);
        size += numNew;
        return numNew != 0;
    }

    /**
     * Inserts all of the elements in the specified collection into this
     * list, starting at the specified position.  Shifts the element
     * currently at that position (if any) and any subsequent elements to
     * the right (increases their indices).  The new elements will appear
     * in the list in the order that they are returned by the
     * specified collection's iterator.
     *
     * @param index index at which to insert the first element from the
     *              specified collection
     * @param c collection containing elements to be added to this list
     * @return <tt>true</tt> if this list changed as a result of the call
     * @throws IndexOutOfBoundsException {@inheritDoc}
     * @throws NullPointerException if the specified collection is null
     */
    public boolean addAll(int index, Collection<? extends E> c) {
        rangeCheckForAdd(index);

        Object[] a = c.toArray();
        int numNew = a.length;
        ensureCapacityInternal(size + numNew);  // Increments modCount

        // 相比 `addAll(Collection<? extends E> c)`,多了这一部分
        int numMoved = size - index;
        if (numMoved > 0)
            System.arraycopy(elementData, index, elementData, index + numNew,
                             numMoved);

        System.arraycopy(a, 0, elementData, index, numNew);
        size += numNew;
        return numNew != 0;
    }
2
3
4
5
6
7
8
9
10
11
12
13
14
15
16
17
18
19
20
21
22
23
24
25
26
27
28
29
30
31
32
33
34
35
36
37
38
39
40
41
42
43
44
45
46
47
48
49
50
51
52
53
54
2
3
4
5
6
7
8
9
10
11
12
13
14
15
16
17
18
19
20
21
22
23
24
25
26
27
28
29
30
31
32
33
34
35
36
37
38
39
40
41
42
43
44
45
46
47
48
49
50
51
52
53
54
# set()
既然底层是一个数组,ArrayList的set()方法也就变得非常简单,直接对数组的指定位置赋值即可。
public E set(int index, E element) {
    rangeCheck(index); // 下标越界检查
    E oldValue = elementData(index);
    elementData[index] = element; // 赋值到指定位置,复制的仅仅是引用
    return oldValue;
}
2
3
4
5
6
2
3
4
5
6
# get()
get()方法同样很简单,唯一要注意的是由于底层数组是Object[],得到元素后需要进行类型转换。
public E get(int index) {
    rangeCheck(index);
    return (E) elementData[index]; // 注意类型转换
}
2
3
4
2
3
4
# remove()
remove()方法也有两个版本,一个是remove(int index)删除指定位置的元素,另一个是remove(Object o)删除第一个满足o.equals(elementData[index])的元素。删除操作是add()操作的逆过程,需要将删除点之后的元素向前移动一个位置。需要注意的是为了让GC起作用,必须显式的为最后一个位置赋null值。
public E remove(int index) {
    rangeCheck(index);
    modCount++;
    E oldValue = elementData(index);
    int numMoved = size - index - 1;
    if (numMoved > 0)
        System.arraycopy(elementData, index+1, elementData, index, numMoved);
    elementData[--size] = null; //清除该位置的引用,让GC起作用
    return oldValue;
}
2
3
4
5
6
7
8
9
10
2
3
4
5
6
7
8
9
10
关于Java GC这里需要特别说明一下,有了垃圾收集器并不意味着一定不会有内存泄漏。对象能否被GC的依据是是否还有引用指向它,上面代码中如果不手动赋null值,除非对应的位置被其他元素覆盖,否则原来的对象就一直不会被回收。
# trimToSize()
ArrayList还给我们提供了将底层数组的容量调整为当前列表保存的实际元素的大小的功能。它可以通过trimToSize方法来实现。代码如下:
    /**
     * Trims the capacity of this <tt>ArrayList</tt> instance to be the
     * list's current size.  An application can use this operation to minimize
     * the storage of an <tt>ArrayList</tt> instance.
     */
    public void trimToSize() {
        modCount++;
        if (size < elementData.length) {
            elementData = (size == 0)
              ? EMPTY_ELEMENTDATA
              : Arrays.copyOf(elementData, size);
        }
    }
2
3
4
5
6
7
8
9
10
11
12
13
2
3
4
5
6
7
8
9
10
11
12
13
# indexOf(), lastIndexOf()
这两个方法都是获取元素在ArrayList中的索引值的。
获取元素的第一次出现的index:
/**
* Returns the index of the first occurrence of the specified element
* in this list, or -1 if this list does not contain the element.
* More formally, returns the lowest index <tt>i</tt> such that
* <tt>(o==null ? get(i)==null : o.equals(get(i)))</tt>,
* or -1 if there is no such index.
*/
public int indexOf(Object o) {
if (o == null) {
for (int i = 0; i < size; i++)
if (elementData[i]==null)
return i;
} else {
for (int i = 0; i < size; i++)
if (o.equals(elementData[i]))
return i;
}
return -1;
}
2
3
4
5
6
7
8
9
10
11
12
13
14
15
16
17
18
19
2
3
4
5
6
7
8
9
10
11
12
13
14
15
16
17
18
19
获取元素的最后一次出现的index:
/**
* Returns the index of the last occurrence of the specified element
* in this list, or -1 if this list does not contain the element.
* More formally, returns the highest index <tt>i</tt> such that
* <tt>(o==null ? get(i)==null : o.equals(get(i)))</tt>,
* or -1 if there is no such index.
*/
public int lastIndexOf(Object o) {
if (o == null) {
for (int i = size-1; i >= 0; i--)
if (elementData[i]==null)
return i;
} else {
for (int i = size-1; i >= 0; i--)
if (o.equals(elementData[i]))
return i;
}
return -1;
}
2
3
4
5
6
7
8
9
10
11
12
13
14
15
16
17
18
19
2
3
4
5
6
7
8
9
10
11
12
13
14
15
16
17
18
19
# Fail-Fast机制
ArrayList也采用了快速失败的机制,通过记录modCount参数来实现。在面对并发的修改时,迭代器很快就会完全失败,而不是冒着在将来某个不确定时间发生任意不确定行为的风险。
ArrayList实现了一种称为快速失败(Fail-Fast)的机制,该机制在并发修改时会抛出ConcurrentModificationException异常。
这种机制的实现原理是:ArrayList在遍历时会记录列表的修改总数modCount,每次遍历前,迭代器都会检查modCount是否发生改变,如果改变则抛出异常,表示列表并发修改。这个机制的作用是确保在遍历ArrayList时,列表的结构保持稳定,避免并发修改带来未知的结果。
例子:
        List<String> list = new ArrayList<>();
        list.add("A");
        list.add("B");
        list.add("C");

        for(String s : list){
            if("C".equals(s)){
                list.remove(s);
            }
        }

		System.out.println(list);
2
3
4
5
6
7
8
9
10
11
12
2
3
4
5
6
7
8
9
10
11
12
java.util.ConcurrentModificationException
	at java.util.ArrayList$Itr.checkForComodification(ArrayList.java:911)
	...
2
3
2
3
因为在遍历过程中调用 list.remove(s) 修改了列表结构,这会导致modCount的值增加,迭代器在下一步遍历前检查到modCount改变,所以抛出异常。

例子的底层原理:
AbstractList是ArrayList的父类,AbstractList中定义了modCount并初始化为0,modCount是用来记录修改表结构的次数。
public abstract class AbstractList<E> extends AbstractCollection<E> implements List<E> {
	//...
	protected transient int modCount = 0;
	//...
}
2
3
4
5
2
3
4
5
ArrayList的add()操作会将修改次数加一 modCount++,remove()方法同样会使modCount++。
看到ArrayList中的迭代器的实现,先将局部变量expectModCount的值设为modCount的值,在next()方法中最开始会执行一个checkForComodification()方法。
checkForComodification()方法的作用就是检查expectedModCount与modCount是否相等,如果在迭代遍历过程中发生了对list结构的修改操作,modCount的值就不会跟expectedModCount相等,然后抛出异常。
    /**
     * An optimized version of AbstractList.Itr
     */
    private class Itr implements Iterator<E> {
        int cursor;       // index of next element to return
        int lastRet = -1; // index of last element returned; -1 if no such
        int expectedModCount = modCount;

        Itr() {}

        public boolean hasNext() {
            return cursor != size;
        }

        @SuppressWarnings("unchecked")
        public E next() {
            checkForComodification();
            int i = cursor;
            if (i >= size)
                throw new NoSuchElementException();
            Object[] elementData = ArrayList.this.elementData;
            if (i >= elementData.length)
                throw new ConcurrentModificationException();
            cursor = i + 1;
            return (E) elementData[lastRet = i];
        }

        //...

        final void checkForComodification() {
            if (modCount != expectedModCount)
                throw new ConcurrentModificationException();
        }
    }
2
3
4
5
6
7
8
9
10
11
12
13
14
15
16
17
18
19
20
21
22
23
24
25
26
27
28
29
30
31
32
33
34
2
3
4
5
6
7
8
9
10
11
12
13
14
15
16
17
18
19
20
21
22
23
24
25
26
27
28
29
30
31
32
33
34
# 参考
- 深入Java集合学习系列: ArrayList的实现原理 http://zhangshixi.iteye.com/blog/674856 (opens new window)
- Java ArrayList源码剖析 结合源码对ArrayList进行讲解 http://www.cnblogs.com/CarpenterLee/p/5419880.html (opens new window)
- ArrayList快速失败机制 https://blog.csdn.net/weixin_43636205/article/details/130551559 (opens new window)
# LinkedList
# 概述
LinkedList 是一个基于双向链表实现的集合类,经常被拿来和 ArrayList 做比较。不过,我们在项目中一般是不会使用到 LinkedList 的,需要用到 LinkedList 的场景几乎都可以使用 ArrayList 来代替,并且,性能通常会更好!就连 LinkedList 的作者约书亚 · 布洛克(Josh Bloch)自己都说从来不会使用 LinkedList 。
LinkedList 同时实现了 List 接口和 Deque 接口,也就是说它既可以看作一个顺序容器,又可以看作一个队列(Queue),同时又可以看作一个栈(Stack)。这样看来,LinkedList 简直就是个全能冠军。
当你需要使用栈或者队列时,可以考虑使用 LinkedList,一方面是因为Java官方已经声明不建议使用Stack类,更遗憾的是,Java里根本没有一个叫做Queue的类(它是个接口名字)。
关于栈或队列,现在的首选是 ArrayDeque ,它有着比 LinkedList (当作栈或队列使用时)有着更好的性能。
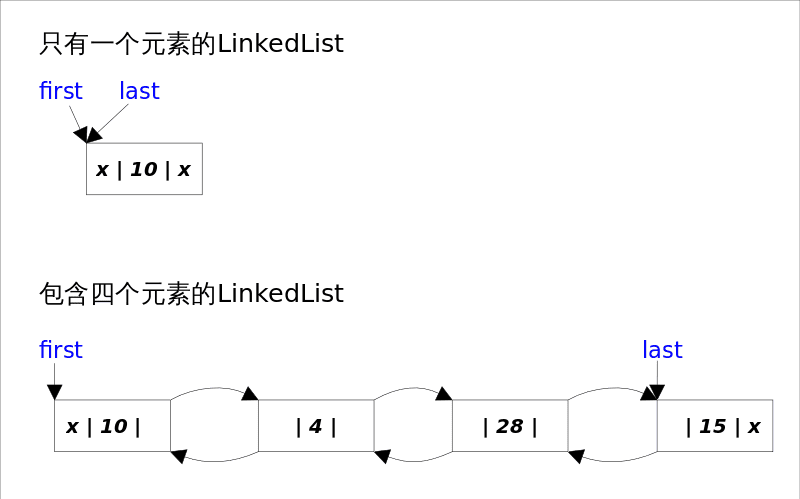
LinkedList的实现方式决定了所有跟下标相关的操作都是线性时间 ,而在首段或者末尾删除元素只需要常数时间 。为追求效率LinkedList没有实现 同步(synchronized),如果需要多个线程并发访问,可以先采用 Collections.synchronizedList() 方法对其进行包装。
# LinkedList实现
# 底层数据结构
LinkedList底层通过双向链表实现,本节将着重讲解插入和删除元素时双向链表的维护过程,也即是直接跟 List 接口相关的函数,而将 Queue 和 Stack 以及 Deque 相关的知识放在下一节讲。
先看一下 LinkedList 的类定义:
public class LinkedList<E>
    extends AbstractSequentialList<E>
    implements List<E>, Deque<E>, Cloneable, java.io.Serializable
{
  //...
}
2
3
4
5
6
2
3
4
5
6
LinkedList 实现了以下接口:
List: 表明它是一个列表,支持添加、删除、查找等操作,并且可以通过下标进行访问。Deque:继承自Queue接口,具有双端队列的特性,支持从两端插入和删除元素,方便实现栈和队列等数据结构。需要注意,Deque的发音为 "deck" [dɛk],这个大部分人都会读错。Cloneable:表明它具有拷贝能力,可以进行深拷贝或浅拷贝操作。Serializable: 表明它可以进行序列化操作,也就是可以将对象转换为字节流进行持久化存储或网络传输,非常方便。
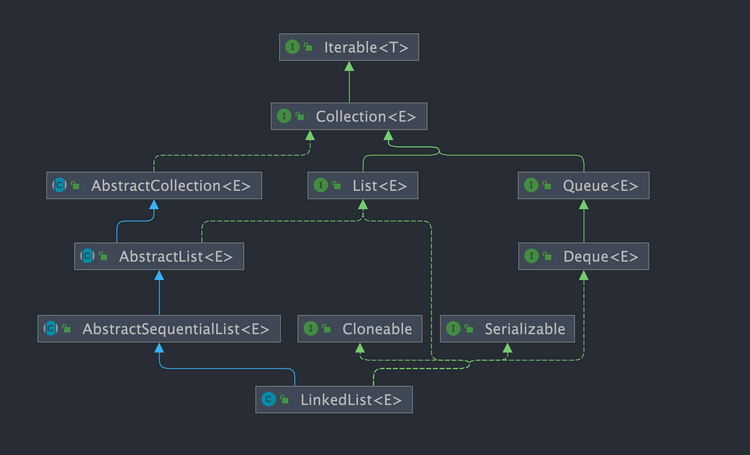
双向链表的每个节点用内部类 Node 表示。LinkedList 通过 first 和 last 引用分别指向链表的第一个和最后一个元素。注意这里没有所谓的哑元,当链表为空的时候 first 和 last 都指向 null。
transient int size = 0;

/**
     * Pointer to first node.
     * Invariant: (first == null && last == null) ||
     *            (first.prev == null && first.item != null)
     */
transient Node<E> first;

/**
     * Pointer to last node.
     * Invariant: (first == null && last == null) ||
     *            (last.next == null && last.item != null)
     */
transient Node<E> last;
2
3
4
5
6
7
8
9
10
11
12
13
14
15
2
3
4
5
6
7
8
9
10
11
12
13
14
15
其中 Node 是私有的内部类:
    private static class Node<E> {
        E item;
        Node<E> next;
        Node<E> prev;

        Node(Node<E> prev, E element, Node<E> next) {
            this.item = element;
            this.next = next;
            this.prev = prev;
        }
    }
2
3
4
5
6
7
8
9
10
11
2
3
4
5
6
7
8
9
10
11
# 构造函数
    /**
     * Constructs an empty list.
     */
    public LinkedList() {
    }

    /**
     * Constructs a list containing the elements of the specified
     * collection, in the order they are returned by the collection's
     * iterator.
     *
     * @param  c the collection whose elements are to be placed into this list
     * @throws NullPointerException if the specified collection is null
     */
    // 接收一个集合类型作为参数,会创建一个与传入集合相同元素的链表对象
    public LinkedList(Collection<? extends E> c) {
        this();
        addAll(c);
    }
2
3
4
5
6
7
8
9
10
11
12
13
14
15
16
17
18
19
2
3
4
5
6
7
8
9
10
11
12
13
14
15
16
17
18
19
# 获取元素
LinkedList 获取元素相关的方法一共有 3 个:
getFirst():获取链表的第一个元素。getLast():获取链表的最后一个元素。get(int index):获取链表指定位置的元素。
    /**
     * Returns the first element in this list.
     *
     * @return the first element in this list
     * @throws NoSuchElementException if this list is empty
     */
    public E getFirst() {
        final Node<E> f = first;
        if (f == null)
            throw new NoSuchElementException();
        return f.item;
    }

    /**
     * Returns the last element in this list.
     *
     * @return the last element in this list
     * @throws NoSuchElementException if this list is empty
     */
    public E getLast() {
        final Node<E> l = last;
        if (l == null)
            throw new NoSuchElementException();
        return l.item;
    }

    // 获取链表指定位置的元素
    public E get(int index) {
    // 下标越界检查,如果越界就抛异常
    checkElementIndex(index);
    // 返回链表中对应下标的元素
    return node(index).item;
    }
2
3
4
5
6
7
8
9
10
11
12
13
14
15
16
17
18
19
20
21
22
23
24
25
26
27
28
29
30
31
32
33
2
3
4
5
6
7
8
9
10
11
12
13
14
15
16
17
18
19
20
21
22
23
24
25
26
27
28
29
30
31
32
33
这里的核心是 node(int index) 方法:
// 返回指定下标的非空节点
Node<E> node(int index) {
    // 断言下标未越界
    // assert isElementIndex(index);
    // 如果index小于size的二分之一  从前开始查找(向后查找)  反之向前查找
    if (index < (size >> 1)) {
        Node<E> x = first;
        // 遍历,循环向后查找,直至 i == index
        for (int i = 0; i < index; i++)
            x = x.next;
        return x;
    } else {
        Node<E> x = last;
        for (int i = size - 1; i > index; i--)
            x = x.prev;
        return x;
    }
}
2
3
4
5
6
7
8
9
10
11
12
13
14
15
16
17
18
2
3
4
5
6
7
8
9
10
11
12
13
14
15
16
17
18
get(int index) 或 remove(int index) 等方法内部都调用了该方法来获取对应的节点。
从这个方法的源码可以看出,该方法通过比较索引值与链表 size 的一半大小来确定从链表头还是尾开始遍历。如果索引值小于 size 的一半,就从链表头开始遍历,反之从链表尾开始遍历。这样可以在较短的时间内找到目标节点,充分利用了双向链表的特性来提高效率。
# 删除元素
LinkedList 删除元素相关的方法一共有 5 个:
removeFirst():删除并返回链表的第一个元素。removeLast():删除并返回链表的最后一个元素。remove(E e):删除链表中首次出现的指定元素,如果不存在该元素则返回 false。remove(int index):删除指定索引处的元素,并返回该元素的值。void clear():移除此链表中的所有元素。
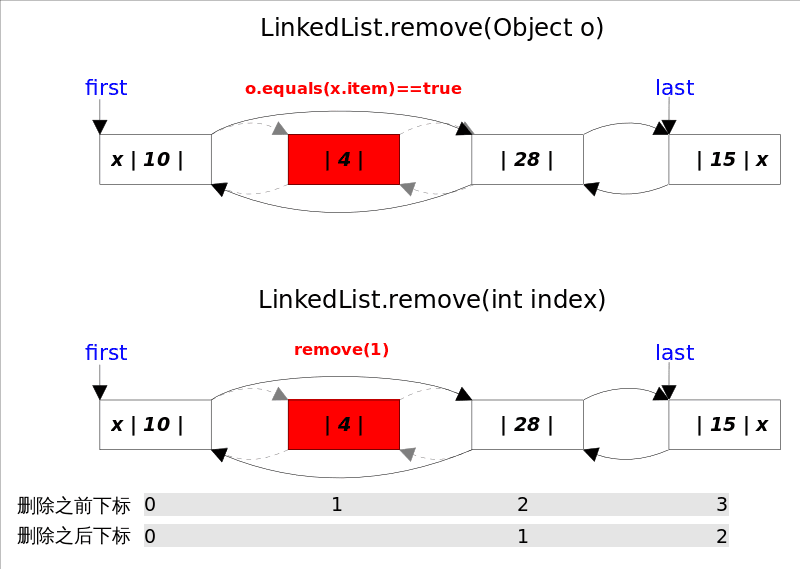
删除元素 - 指的是删除第一次出现的这个元素, 如果没有这个元素,则返回false;判断的依据是equals方法, 如果equals,则直接unlink这个node;由于LinkedList可存放null元素,故也可以删除第一次出现null的元素;
// 删除并返回链表的第一个元素
public E removeFirst() {
    final Node<E> f = first;
    if (f == null)
        throw new NoSuchElementException();
    return unlinkFirst(f);
}

// 删除并返回链表的最后一个元素
public E removeLast() {
    final Node<E> l = last;
    if (l == null)
        throw new NoSuchElementException();
    return unlinkLast(l);
}

// 删除链表中首次出现的指定元素,如果不存在该元素则返回 false
public boolean remove(Object o) {
    // 如果指定元素为 null,遍历链表找到第一个为 null 的元素进行删除
    if (o == null) {
        for (Node<E> x = first; x != null; x = x.next) {
            if (x.item == null) {
                unlink(x);
                return true;
            }
        }
    } else {
        // 如果不为 null ,遍历链表找到要删除的节点
        for (Node<E> x = first; x != null; x = x.next) {
            if (o.equals(x.item)) {
                unlink(x);
                return true;
            }
        }
    }
    return false;
}

// `remove(int index)`使用的是下标计数, 只需要判断该`index`是否有元素即可,如果有则直接`unlink`这个`node`。
// 删除链表指定位置的元素
public E remove(int index) {
    // 下标越界检查,如果越界就抛异常
    checkElementIndex(index);
    return unlink(node(index));
}
2
3
4
5
6
7
8
9
10
11
12
13
14
15
16
17
18
19
20
21
22
23
24
25
26
27
28
29
30
31
32
33
34
35
36
37
38
39
40
41
42
43
44
45
2
3
4
5
6
7
8
9
10
11
12
13
14
15
16
17
18
19
20
21
22
23
24
25
26
27
28
29
30
31
32
33
34
35
36
37
38
39
40
41
42
43
44
45
这里的核心在于 unlink(Node<E> x) 这个方法:
E unlink(Node<E> x) {
    // 断言 x 不为 null
    // assert x != null;
    // 获取当前节点(也就是待删除节点)的元素
    final E element = x.item;
    // 获取当前节点的下一个节点
    final Node<E> next = x.next;
    // 获取当前节点的前一个节点
    final Node<E> prev = x.prev;

    // 如果前一个节点为空,则说明当前节点是头节点
    if (prev == null) {
        // 直接让链表头指向当前节点的下一个节点
        first = next;
    } else { // 如果前一个节点不为空
        // 将前一个节点的 next 指针指向当前节点的下一个节点
        prev.next = next;
        // 将当前节点的 prev 指针置为 null,,方便 GC 回收
        x.prev = null;
    }

    // 如果下一个节点为空,则说明当前节点是尾节点
    if (next == null) {
        // 直接让链表尾指向当前节点的前一个节点
        last = prev;
    } else { // 如果下一个节点不为空
        // 将下一个节点的 prev 指针指向当前节点的前一个节点
        next.prev = prev;
        // 将当前节点的 next 指针置为 null,方便 GC 回收
        x.next = null;
    }

    // 将当前节点元素置为 null,方便 GC 回收
    x.item = null;
    size--;
    modCount++;
    return element;
}
2
3
4
5
6
7
8
9
10
11
12
13
14
15
16
17
18
19
20
21
22
23
24
25
26
27
28
29
30
31
32
33
34
35
36
37
38
2
3
4
5
6
7
8
9
10
11
12
13
14
15
16
17
18
19
20
21
22
23
24
25
26
27
28
29
30
31
32
33
34
35
36
37
38
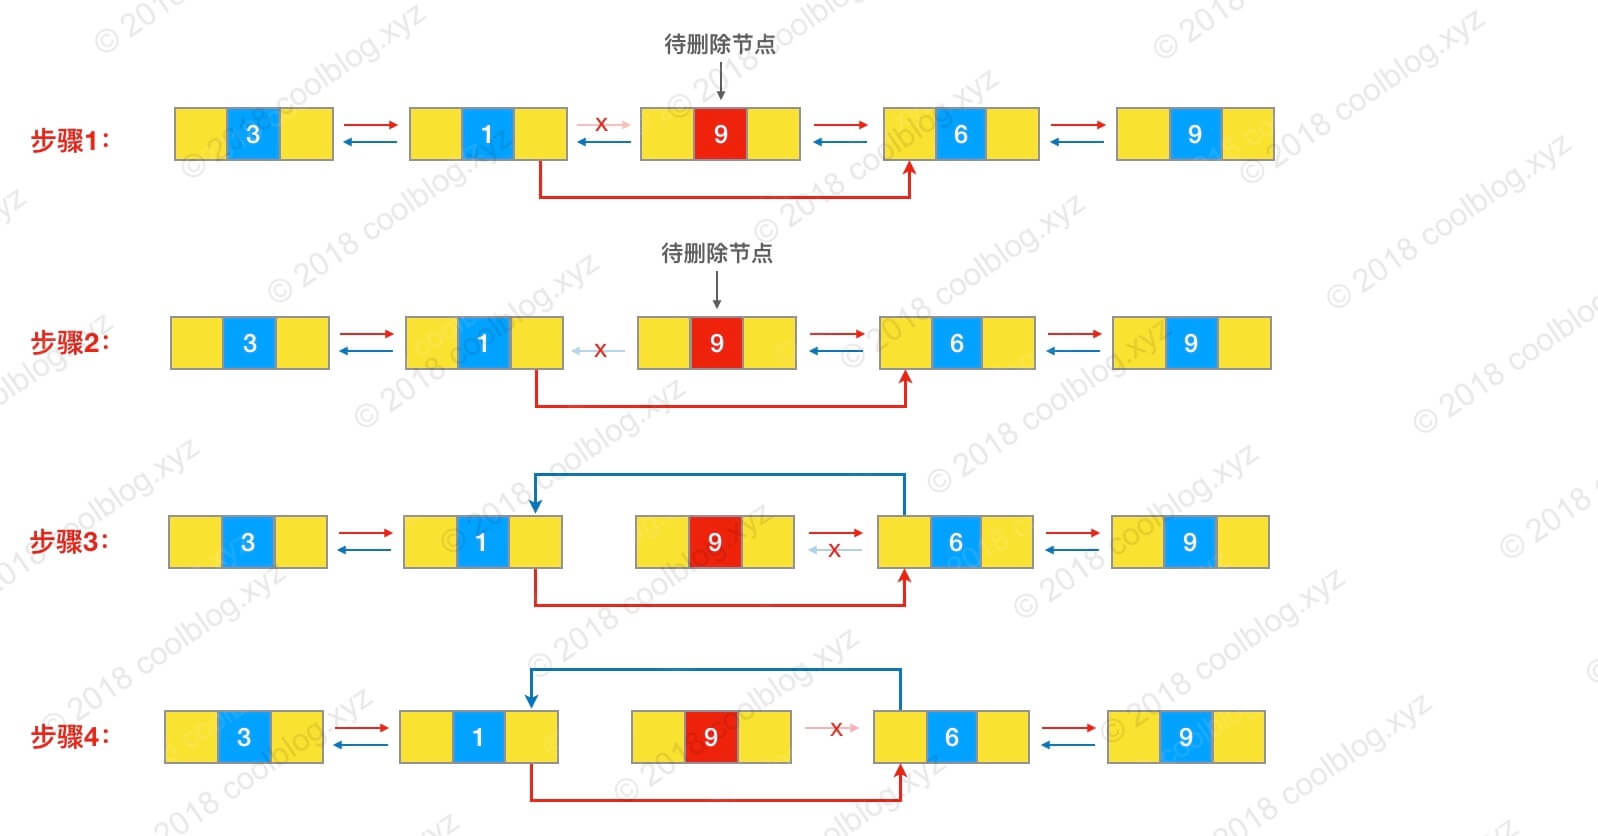
unlink() 方法的逻辑如下:
- 首先获取待删除节点
x的前驱和后继节点; - 判断待删除节点是否为头节点或尾节点:
- 如果
x是头节点,则将first指向x的后继节点next - 如果
x是尾节点,则将last指向x的前驱节点prev - 如果
x不是头节点也不是尾节点,执行下一步操作
- 如果
- 将待删除节点
x的前驱的后继指向待删除节点的后继next,断开x和x.prev之间的链接; - 将待删除节点
x的后继的前驱指向待删除节点的前驱prev,断开x和x.next之间的链接; - 将待删除节点
x的元素置空,修改链表长度。
参考下图理解:
当然,对于 removeFirst() 和 removeLast(),也分别对应了各自的 unlink函数
    /**
     * Unlinks non-null first node f.
     */
    private E unlinkFirst(Node<E> f) {
        // assert f == first && f != null;
        final E element = f.item;
        final Node<E> next = f.next;
        f.item = null;
        f.next = null; // help GC
        first = next;
        if (next == null)
            last = null;
        else
            next.prev = null;
        size--;
        modCount++;
        return element;
    }

    /**
     * Unlinks non-null last node l.
     */
    private E unlinkLast(Node<E> l) {
        // assert l == last && l != null;
        final E element = l.item;
        final Node<E> prev = l.prev;
        l.item = null;
        l.prev = null; // help GC
        last = prev;
        if (prev == null)
            first = null;
        else
            prev.next = null;
        size--;
        modCount++;
        return element;
    }
2
3
4
5
6
7
8
9
10
11
12
13
14
15
16
17
18
19
20
21
22
23
24
25
26
27
28
29
30
31
32
33
34
35
36
37
2
3
4
5
6
7
8
9
10
11
12
13
14
15
16
17
18
19
20
21
22
23
24
25
26
27
28
29
30
31
32
33
34
35
36
37
# 插入元素
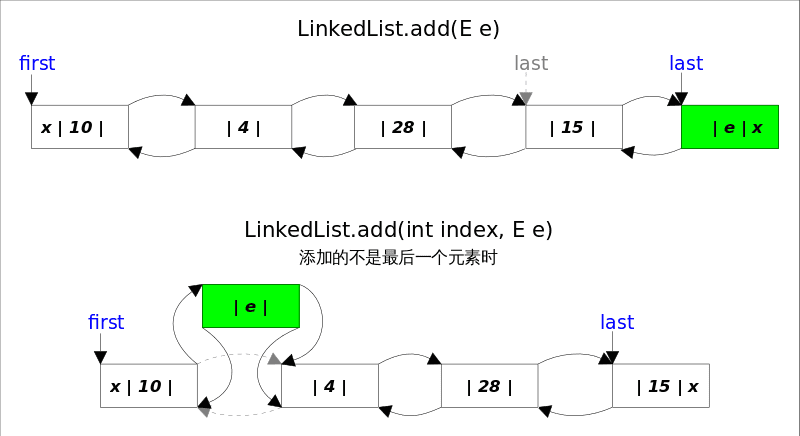
add()方法有两个版本,
- 一个是
add(E e),该方法在LinkedList的末尾插入元素,因为有last指向链表末尾,在末尾插入元素的花费是常数时间 。只需要简单修改几个相关引用即可; - 另一个是
add(int index, E element),该方法是在指定下表处插入元素,需要先通过线性查找 找到具体位置,然后修改相关引用完成插入操作。
// 在链表尾部插入元素
public boolean add(E e) {
    linkLast(e);
    return true;
}

// 在链表指定位置插入元素
public void add(int index, E element) {
    // 下标越界检查
    checkPositionIndex(index);

    // 判断 index 是不是链表尾部位置
    if (index == size)
        // 如果是就直接调用 linkLast 方法将元素节点插入链表尾部即可
        linkLast(element);
    else
        // 如果不是则调用 linkBefore 方法将其插入指定元素之前
        linkBefore(element, node(index));
}

// 将元素节点插入到链表尾部
void linkLast(E e) {
    // 将最后一个元素赋值(引用传递)给节点 l
    final Node<E> l = last;
    // 创建节点,并指定节点前驱为链表尾节点 last,后继引用为空
    final Node<E> newNode = new Node<>(l, e, null);
    // 将 last 引用指向新节点
    last = newNode;
    // 判断尾节点是否为空
    // 如果 l 是null 意味着这是第一次添加元素
    if (l == null)
        // 如果是第一次添加,将first赋值为新节点,此时链表只有一个元素
        first = newNode;
    else
        // 如果不是第一次添加,将新节点赋值给l(添加前的最后一个元素)的next
        l.next = newNode;
    size++;
    modCount++;
}

// 在指定元素之前插入元素
void linkBefore(E e, Node<E> succ) {
    // assert succ != null;断言 succ不为 null
    // 定义一个节点元素保存 succ 的 prev 引用,也就是它的前一节点信息
    final Node<E> pred = succ.prev;
    // 初始化节点,并指明前驱和后继节点
    final Node<E> newNode = new Node<>(pred, e, succ);
    // 将 succ 节点前驱引用 prev 指向新节点
    succ.prev = newNode;
    // 判断尾节点是否为空,为空表示当前链表还没有节点
    if (pred == null)
        first = newNode;
    else
        // succ 节点前驱的后继引用指向新节点
        pred.next = newNode;
    size++;
    modCount++;
}
2
3
4
5
6
7
8
9
10
11
12
13
14
15
16
17
18
19
20
21
22
23
24
25
26
27
28
29
30
31
32
33
34
35
36
37
38
39
40
41
42
43
44
45
46
47
48
49
50
51
52
53
54
55
56
57
58
59
2
3
4
5
6
7
8
9
10
11
12
13
14
15
16
17
18
19
20
21
22
23
24
25
26
27
28
29
30
31
32
33
34
35
36
37
38
39
40
41
42
43
44
45
46
47
48
49
50
51
52
53
54
55
56
57
58
59
add(int index, E element) 图解:
- 当
index==size时,等同于add(E e); - 如果不是,则分两步:
- 1)先根据
index找到要插入的位置,即node(index)方法; - 2)修改引用,完成插入操作。
- 1)先根据
# addAll()
addAll(index, c) 实现方式并不是直接调用 add(index,e) 来实现,主要是因为效率的问题,另一个是 Fail-Fast 中 modCount 只会增加1次;
    /**
     * Appends all of the elements in the specified collection to the end of
     * this list, in the order that they are returned by the specified
     * collection's iterator.  The behavior of this operation is undefined if
     * the specified collection is modified while the operation is in
     * progress.  (Note that this will occur if the specified collection is
     * this list, and it's nonempty.)
     *
     * @param c collection containing elements to be added to this list
     * @return {@code true} if this list changed as a result of the call
     * @throws NullPointerException if the specified collection is null
     */
    public boolean addAll(Collection<? extends E> c) {
        return addAll(size, c);
    }

    /**
     * Inserts all of the elements in the specified collection into this
     * list, starting at the specified position.  Shifts the element
     * currently at that position (if any) and any subsequent elements to
     * the right (increases their indices).  The new elements will appear
     * in the list in the order that they are returned by the
     * specified collection's iterator.
     *
     * @param index index at which to insert the first element
     *              from the specified collection
     * @param c collection containing elements to be added to this list
     * @return {@code true} if this list changed as a result of the call
     * @throws IndexOutOfBoundsException {@inheritDoc}
     * @throws NullPointerException if the specified collection is null
     */
    public boolean addAll(int index, Collection<? extends E> c) {
        checkPositionIndex(index);

        Object[] a = c.toArray();
        int numNew = a.length;
        if (numNew == 0)
            return false;

        Node<E> pred, succ;
        if (index == size) {
            succ = null;
            pred = last;
        } else {
            succ = node(index);
            pred = succ.prev;
        }

        for (Object o : a) {
            @SuppressWarnings("unchecked") E e = (E) o;
            Node<E> newNode = new Node<>(pred, e, null);
            if (pred == null)
                first = newNode;
            else
                pred.next = newNode;
            pred = newNode;
        }

        if (succ == null) {
            last = pred;
        } else {
            pred.next = succ;
            succ.prev = pred;
        }

        size += numNew;
        modCount++;
        return true;
    }
2
3
4
5
6
7
8
9
10
11
12
13
14
15
16
17
18
19
20
21
22
23
24
25
26
27
28
29
30
31
32
33
34
35
36
37
38
39
40
41
42
43
44
45
46
47
48
49
50
51
52
53
54
55
56
57
58
59
60
61
62
63
64
65
66
67
68
69
2
3
4
5
6
7
8
9
10
11
12
13
14
15
16
17
18
19
20
21
22
23
24
25
26
27
28
29
30
31
32
33
34
35
36
37
38
39
40
41
42
43
44
45
46
47
48
49
50
51
52
53
54
55
56
57
58
59
60
61
62
63
64
65
66
67
68
69
# clear()
为了让GC更快可以回收放置的元素,需要将node之间的引用关系赋空。
    /**
     * Removes all of the elements from this list.
     * The list will be empty after this call returns.
     */
    public void clear() {
        // Clearing all of the links between nodes is "unnecessary", but:
        // - helps a generational GC if the discarded nodes inhabit
        //   more than one generation
        // - is sure to free memory even if there is a reachable Iterator
        for (Node<E> x = first; x != null; ) {
            Node<E> next = x.next;
            x.item = null;
            x.next = null;
            x.prev = null;
            x = next;
        }
        first = last = null;
        size = 0;
        modCount++;
    }
2
3
4
5
6
7
8
9
10
11
12
13
14
15
16
17
18
19
20
2
3
4
5
6
7
8
9
10
11
12
13
14
15
16
17
18
19
20
# Positional Access 方法
通过index获取元素
    /**
     * Returns the element at the specified position in this list.
     *
     * @param index index of the element to return
     * @return the element at the specified position in this list
     * @throws IndexOutOfBoundsException {@inheritDoc}
     */
    public E get(int index) {
        checkElementIndex(index);
        return node(index).item;
    }
2
3
4
5
6
7
8
9
10
11
2
3
4
5
6
7
8
9
10
11
将某个位置的元素重新赋值:
    /**
     * Replaces the element at the specified position in this list with the
     * specified element.
     *
     * @param index index of the element to replace
     * @param element element to be stored at the specified position
     * @return the element previously at the specified position
     * @throws IndexOutOfBoundsException {@inheritDoc}
     */
    public E set(int index, E element) {
        checkElementIndex(index);
        Node<E> x = node(index);
        E oldVal = x.item;
        x.item = element;
        return oldVal;
    }
2
3
4
5
6
7
8
9
10
11
12
13
14
15
16
2
3
4
5
6
7
8
9
10
11
12
13
14
15
16
将元素插入到指定index位置:
    /**
     * Inserts the specified element at the specified position in this list.
     * Shifts the element currently at that position (if any) and any
     * subsequent elements to the right (adds one to their indices).
     *
     * @param index index at which the specified element is to be inserted
     * @param element element to be inserted
     * @throws IndexOutOfBoundsException {@inheritDoc}
     */
    public void add(int index, E element) {
        checkPositionIndex(index);

        if (index == size)
            linkLast(element);
        else
            linkBefore(element, node(index));
    }
2
3
4
5
6
7
8
9
10
11
12
13
14
15
16
17
2
3
4
5
6
7
8
9
10
11
12
13
14
15
16
17
删除指定位置的元素:
    /**
     * Removes the element at the specified position in this list.  Shifts any
     * subsequent elements to the left (subtracts one from their indices).
     * Returns the element that was removed from the list.
     *
     * @param index the index of the element to be removed
     * @return the element previously at the specified position
     * @throws IndexOutOfBoundsException {@inheritDoc}
     */
    public E remove(int index) {
        checkElementIndex(index);
        return unlink(node(index));
    }
2
3
4
5
6
7
8
9
10
11
12
13
2
3
4
5
6
7
8
9
10
11
12
13
其它位置的方法:
    /**
     * Tells if the argument is the index of an existing element.
     */
    private boolean isElementIndex(int index) {
        return index >= 0 && index < size;
    }

    /**
     * Tells if the argument is the index of a valid position for an
     * iterator or an add operation.
     */
    private boolean isPositionIndex(int index) {
        return index >= 0 && index <= size;
    }

    /**
     * Constructs an IndexOutOfBoundsException detail message.
     * Of the many possible refactorings of the error handling code,
     * this "outlining" performs best with both server and client VMs.
     */
    private String outOfBoundsMsg(int index) {
        return "Index: "+index+", Size: "+size;
    }

    private void checkElementIndex(int index) {
        if (!isElementIndex(index))
            throw new IndexOutOfBoundsException(outOfBoundsMsg(index));
    }

    private void checkPositionIndex(int index) {
        if (!isPositionIndex(index))
            throw new IndexOutOfBoundsException(outOfBoundsMsg(index));
    }
2
3
4
5
6
7
8
9
10
11
12
13
14
15
16
17
18
19
20
21
22
23
24
25
26
27
28
29
30
31
32
33
2
3
4
5
6
7
8
9
10
11
12
13
14
15
16
17
18
19
20
21
22
23
24
25
26
27
28
29
30
31
32
33
# 查找操作
查找操作的本质是查找元素的下标,
查找第一次出现的index,如果找不到返回-1;
/**
* Returns the index of the first occurrence of the specified element
* in this list, or -1 if this list does not contain the element.
* More formally, returns the lowest index {@code i} such that
* <tt>(o==null ? get(i)==null : o.equals(get(i)))</tt>,
* or -1 if there is no such index.
*
* @param o element to search for
* @return the index of the first occurrence of the specified element in
* this list, or -1 if this list does not contain the element
*/
public int indexOf(Object o) {
int index = 0;
if (o == null) {
for (Node<E> x = first; x != null; x = x.next) {
if (x.item == null)
return index;
index++;
}
} else {
for (Node<E> x = first; x != null; x = x.next) {
if (o.equals(x.item))
return index;
index++;
}
}
return -1;
}
2
3
4
5
6
7
8
9
10
11
12
13
14
15
16
17
18
19
20
21
22
23
24
25
26
27
28
2
3
4
5
6
7
8
9
10
11
12
13
14
15
16
17
18
19
20
21
22
23
24
25
26
27
28
查找最后一次出现的index, 如果找不到返回-1;
/**
* Returns the index of the last occurrence of the specified element
* in this list, or -1 if this list does not contain the element.
* More formally, returns the highest index {@code i} such that
* <tt>(o==null ? get(i)==null : o.equals(get(i)))</tt>,
* or -1 if there is no such index.
*
* @param o element to search for
* @return the index of the last occurrence of the specified element in
* this list, or -1 if this list does not contain the element
*/
public int lastIndexOf(Object o) {
int index = size;
if (o == null) {
for (Node<E> x = last; x != null; x = x.prev) {
index--;
if (x.item == null)
return index;
}
} else {
for (Node<E> x = last; x != null; x = x.prev) {
index--;
if (o.equals(x.item))
return index;
}
}
return -1;
}
2
3
4
5
6
7
8
9
10
11
12
13
14
15
16
17
18
19
20
21
22
23
24
25
26
27
28
2
3
4
5
6
7
8
9
10
11
12
13
14
15
16
17
18
19
20
21
22
23
24
25
26
27
28
# Queue 方法
    /**
     * Retrieves, but does not remove, the head (first element) of this list.
     *
     * @return the head of this list, or {@code null} if this list is empty
     * @since 1.5
     */
    public E peek() {
        final Node<E> f = first;
        return (f == null) ? null : f.item;
    }

    /**
     * Retrieves, but does not remove, the head (first element) of this list.
     *
     * @return the head of this list
     * @throws NoSuchElementException if this list is empty
     * @since 1.5
     */
    public E element() {
        return getFirst();
    }

    /**
     * Retrieves and removes the head (first element) of this list.
     *
     * @return the head of this list, or {@code null} if this list is empty
     * @since 1.5
     */
    public E poll() {
        final Node<E> f = first;
        return (f == null) ? null : unlinkFirst(f);
    }

    /**
     * Retrieves and removes the head (first element) of this list.
     *
     * @return the head of this list
     * @throws NoSuchElementException if this list is empty
     * @since 1.5
     */
    public E remove() {
        return removeFirst();
    }

    /**
     * Adds the specified element as the tail (last element) of this list.
     *
     * @param e the element to add
     * @return {@code true} (as specified by {@link Queue#offer})
     * @since 1.5
     */
    public boolean offer(E e) {
        return add(e);
    }
2
3
4
5
6
7
8
9
10
11
12
13
14
15
16
17
18
19
20
21
22
23
24
25
26
27
28
29
30
31
32
33
34
35
36
37
38
39
40
41
42
43
44
45
46
47
48
49
50
51
52
53
54
55
2
3
4
5
6
7
8
9
10
11
12
13
14
15
16
17
18
19
20
21
22
23
24
25
26
27
28
29
30
31
32
33
34
35
36
37
38
39
40
41
42
43
44
45
46
47
48
49
50
51
52
53
54
55
# Deque 方法
    /**
     * Inserts the specified element at the front of this list.
     *
     * @param e the element to insert
     * @return {@code true} (as specified by {@link Deque#offerFirst})
     * @since 1.6
     */
    public boolean offerFirst(E e) {
        addFirst(e);
        return true;
    }

    /**
     * Inserts the specified element at the end of this list.
     *
     * @param e the element to insert
     * @return {@code true} (as specified by {@link Deque#offerLast})
     * @since 1.6
     */
    public boolean offerLast(E e) {
        addLast(e);
        return true;
    }

    /**
     * Retrieves, but does not remove, the first element of this list,
     * or returns {@code null} if this list is empty.
     *
     * @return the first element of this list, or {@code null}
     *         if this list is empty
     * @since 1.6
     */
    public E peekFirst() {
        final Node<E> f = first;
        return (f == null) ? null : f.item;
     }

    /**
     * Retrieves, but does not remove, the last element of this list,
     * or returns {@code null} if this list is empty.
     *
     * @return the last element of this list, or {@code null}
     *         if this list is empty
     * @since 1.6
     */
    public E peekLast() {
        final Node<E> l = last;
        return (l == null) ? null : l.item;
    }

    /**
     * Retrieves and removes the first element of this list,
     * or returns {@code null} if this list is empty.
     *
     * @return the first element of this list, or {@code null} if
     *     this list is empty
     * @since 1.6
     */
    public E pollFirst() {
        final Node<E> f = first;
        return (f == null) ? null : unlinkFirst(f);
    }

    /**
     * Retrieves and removes the last element of this list,
     * or returns {@code null} if this list is empty.
     *
     * @return the last element of this list, or {@code null} if
     *     this list is empty
     * @since 1.6
     */
    public E pollLast() {
        final Node<E> l = last;
        return (l == null) ? null : unlinkLast(l);
    }

    /**
     * Pushes an element onto the stack represented by this list.  In other
     * words, inserts the element at the front of this list.
     *
     * <p>This method is equivalent to {@link #addFirst}.
     *
     * @param e the element to push
     * @since 1.6
     */
    public void push(E e) {
        addFirst(e);
    }

    /**
     * Pops an element from the stack represented by this list.  In other
     * words, removes and returns the first element of this list.
     *
     * <p>This method is equivalent to {@link #removeFirst()}.
     *
     * @return the element at the front of this list (which is the top
     *         of the stack represented by this list)
     * @throws NoSuchElementException if this list is empty
     * @since 1.6
     */
    public E pop() {
        return removeFirst();
    }

    /**
     * Removes the first occurrence of the specified element in this
     * list (when traversing the list from head to tail).  If the list
     * does not contain the element, it is unchanged.
     *
     * @param o element to be removed from this list, if present
     * @return {@code true} if the list contained the specified element
     * @since 1.6
     */
    public boolean removeFirstOccurrence(Object o) {
        return remove(o);
    }

    /**
     * Removes the last occurrence of the specified element in this
     * list (when traversing the list from head to tail).  If the list
     * does not contain the element, it is unchanged.
     *
     * @param o element to be removed from this list, if present
     * @return {@code true} if the list contained the specified element
     * @since 1.6
     */
    public boolean removeLastOccurrence(Object o) {
        if (o == null) {
            for (Node<E> x = last; x != null; x = x.prev) {
                if (x.item == null) {
                    unlink(x);
                    return true;
                }
            }
        } else {
            for (Node<E> x = last; x != null; x = x.prev) {
                if (o.equals(x.item)) {
                    unlink(x);
                    return true;
                }
            }
        }
        return false;
    }
2
3
4
5
6
7
8
9
10
11
12
13
14
15
16
17
18
19
20
21
22
23
24
25
26
27
28
29
30
31
32
33
34
35
36
37
38
39
40
41
42
43
44
45
46
47
48
49
50
51
52
53
54
55
56
57
58
59
60
61
62
63
64
65
66
67
68
69
70
71
72
73
74
75
76
77
78
79
80
81
82
83
84
85
86
87
88
89
90
91
92
93
94
95
96
97
98
99
100
101
102
103
104
105
106
107
108
109
110
111
112
113
114
115
116
117
118
119
120
121
122
123
124
125
126
127
128
129
130
131
132
133
134
135
136
137
138
139
140
141
142
143
144
# 参考
- Java LinkedList源码剖析 结合源码对LinkedList进行讲解 http://www.cnblogs.com/CarpenterLee/p/5457150.html (opens new window)
# Stack & Queue
# 概述
Java里有一个叫做Stack的类,却没有叫做Queue的类(它是个接口名字)。当需要使用栈时,Java已不推荐使用Stack,而是推荐使用更高效的ArrayDeque;既然Queue只是一个接口,当需要使用队列时也就首选ArrayDeque了(次选是LinkedList)。
# Queue
Queue接口继承自Collection接口,除了最基本的Collection的方法之外,它还支持额外的insertion, extraction和inspection操作。这里有两组格式,共6个方法,一组是抛出异常的实现;另外一组是返回值的实现(没有则返回null)。
| Throws exception | Returns special value | |
|---|---|---|
| Insert | add(e) | offer(e) |
| Remove | remove() | poll() |
| Examine | element() | peek() |
# Deque
Deque是"double ended queue",表示双向的队列(双端队列),英文读作"deck". Deque 继承自 Queue接口,除了支持Queue的方法之外,还支持insert, remove和examine操作,由于Deque是双向的,所以可以对队列的头和尾都进行操作,它同时也支持两组格式,一组是抛出异常的实现;另外一组是返回值的实现(没有则返回null)。共12个方法如下:
| First Element - Head | Last Element - Tail | |||
|---|---|---|---|---|
| Throws exception | Special value | Throws exception | Special value | |
| Insert | addFirst(e) | offerFirst(e) | addLast(e) | offerLast(e) |
| Remove | removeFirst() | pollFirst() | removeLast() | pollLast() |
| Examine | getFirst() | peekFirst() | getLast() | peekLast() |
**Deque**当作**queue**时的方法:
当把Deque当做FIFO的queue来使用时,元素是从deque的尾部添加,从头部进行删除的; 所以deque的部分方法是和queue是等同的。具体如下:
| Queue Method | Equivalent Deque Method | 说明 |
|---|---|---|
add(e) | addLast(e) | 向队尾插入元素,失败则抛出异常 |
offer(e) | offerLast(e) | 向队尾插入元素,失败则返回false |
remove() | removeFirst() | 获取并删除队首元素,失败则抛出异常 |
poll() | pollFirst() | 获取并删除队首元素,失败则返回null |
element() | getFirst() | 获取但不删除队首元素,失败则抛出异常 |
peek() | peekFirst() | 获取但不删除队首元素,失败则返回null |
**Deque**当作**stack**时的方法:
下表列出了Deque与Stack对应的接口:
| Stack Method | Equivalent Deque Method | 说明 |
|---|---|---|
push(e) | addFirst(e) | 向栈顶插入元素,失败则抛出异常 |
| 无 | offerFirst(e) | 向栈顶插入元素,失败则返回false |
pop() | removeFirst() | 获取并删除栈顶元素,失败则抛出异常 |
| 无 | pollFirst() | 获取并删除栈顶元素,失败则返回null |
peek() | getFirst() | 获取但不删除栈顶元素,失败则抛出异常 |
| 无 | peekFirst() | 获取但不删除栈顶元素,失败则返回null |
上面两个表共定义了Deque的12个接口。添加,删除,取值都有两套接口,它们功能相同,区别是对失败情况的处理不同。一套接口遇到失败就会抛出异常,另一套遇到失败会返回特殊值(**false**或**null**)。除非某种实现对容量有限制,大多数情况下,添加操作是不会失败的。虽然**Deque**的接口有12个之多,但无非就是对容器的两端进行操作,或添加,或删除,或查看。明白了这一点讲解起来就会非常简单。
**Deque**的实现:
ArrayDeque和LinkedList是Deque的两个通用实现,由于官方更推荐使用AarryDeque用作栈和队列,加之上一篇已经讲解过LinkedList,本文将着重讲解**ArrayDeque**的具体实现。
从名字可以看出ArrayDeque底层通过数组实现,为了满足可以同时在数组两端插入或删除元素的需求,该数组还必须是循环的,即_循环数组(circular array),也就是说数组的任何一点都可能被看作起点或者终点。ArrayDeque是_非线程安全的(not thread-safe),当多个线程同时使用的时候,需要程序员手动同步;另外,该容器不允许放入null元素(因为需要通过null来判断队列是否为空)。
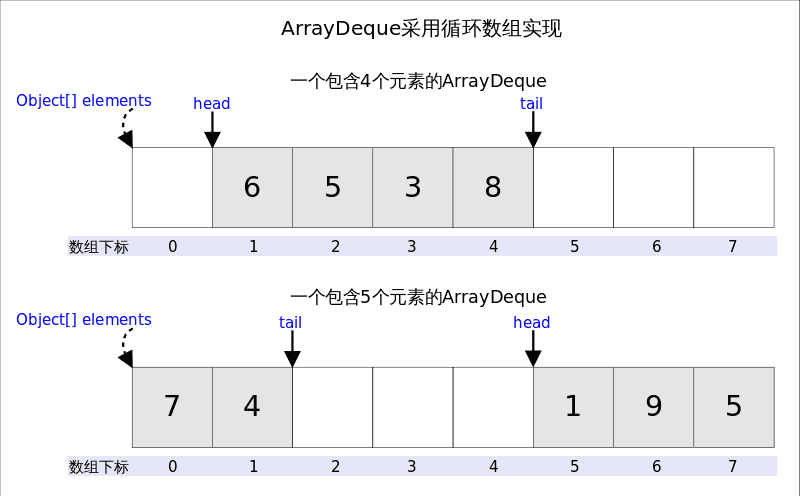
上图中我们看到,head指向首端第一个有效元素,tail指向尾端第一个可以插入元素的空位。因为是循环数组,所以head不一定总等于0,tail也不一定总是比head大。
# 方法剖析
# addFirst()
addFirst(E e)的作用是在Deque的首端插入元素,也就是在head的前面插入元素,在空间足够且下标没有越界的情况下,只需要将elements[--head] = e即可。

实际需要考虑:
- 空间是否够用,以及
- 下标是否越界
的问题。上图中,如果head为0之后接着调用addFirst(),虽然空余空间还够用,但head为-1,下标越界了。下列代码很好的解决了这两个问题。
//addFirst(E e)
public void addFirst(E e) {
    if (e == null)//不允许放入null
        throw new NullPointerException();
    elements[head = (head - 1) & (elements.length - 1)] = e;//2.下标是否越界
    if (head == tail)//1.空间是否够用
        doubleCapacity();//扩容
}
2
3
4
5
6
7
8
2
3
4
5
6
7
8
上述代码我们看到,
- 空间问题是在插入之后解决的,因为
tail总是指向下一个可插入的空位,也就意味着elements数组至少有一个空位,所以插入元素的时候不用考虑空间问题。 - 下标越界的处理解决起来非常简单,
head = (head - 1) & (elements.length - 1)就可以了,这段代码相当于取余,同时解决了**head**为负值的情况。因为elements.length必需是2的指数倍,elements - 1就是二进制低位全1,跟head - 1相与之后就起到了取模的作用,如果head - 1为负数(其实只可能是-1),则相当于对其取相对于elements.length的补码。
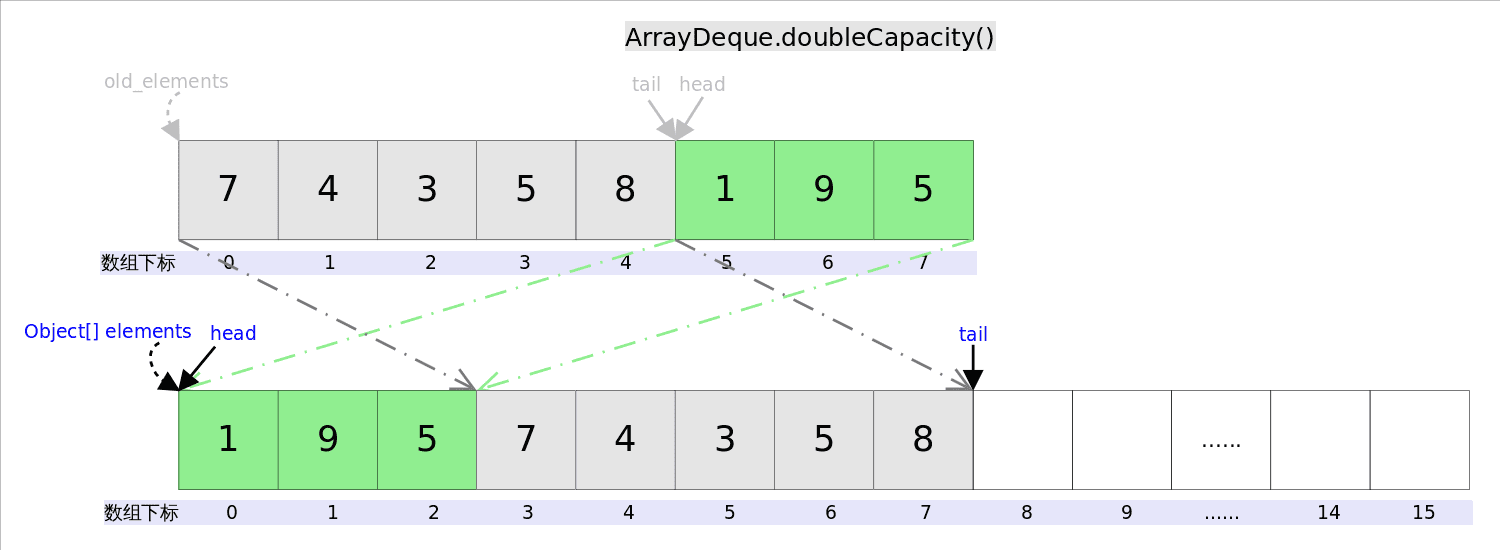
下面再说说扩容函数doubleCapacity(),其逻辑是申请一个更大的数组(原数组的两倍),然后将原数组复制过去。过程如下图所示:
//doubleCapacity()
private void doubleCapacity() {
    assert head == tail;
    int p = head;
    int n = elements.length;
    int r = n - p; // head右边元素的个数
    int newCapacity = n << 1;//原空间的2倍
    if (newCapacity < 0)
        throw new IllegalStateException("Sorry, deque too big");
    Object[] a = new Object[newCapacity];
    System.arraycopy(elements, p, a, 0, r);//复制右半部分,对应上图中绿色部分
    System.arraycopy(elements, 0, a, r, p);//复制左半部分,对应上图中灰色部分
    elements = (E[])a;
    head = 0;
    tail = n;
}
2
3
4
5
6
7
8
9
10
11
12
13
14
15
16
2
3
4
5
6
7
8
9
10
11
12
13
14
15
16
图中和代码中我们看到,复制分两次进行,第一次复制head右边的元素,第二次复制head左边的元素。
# addLast()
addLast(E e)的作用是在Deque的尾端插入元素,也就是在tail的位置插入元素,由于tail总是指向下一个可以插入的空位,因此只需要elements[tail] = e;即可。插入完成后再检查空间,如果空间已经用光,则调用doubleCapacity()进行扩容。

public void addLast(E e) {
    if (e == null)//不允许放入null
        throw new NullPointerException();
    elements[tail] = e;//赋值
    if ( (tail = (tail + 1) & (elements.length - 1)) == head)//下标越界处理
        doubleCapacity();//扩容
}
2
3
4
5
6
7
2
3
4
5
6
7
下标越界处理方式addFirt()中已经讲过,不再赘述。
# pollFirst()
pollFirst()的作用是删除并返回Deque首端元素,也即是head位置处的元素。如果容器不空,只需要直接返回elements[head]即可,当然还需要处理下标的问题。由于ArrayDeque中不允许放入null,当**elements[head] == null**时,意味着容器为空。
public E pollFirst() {
    int h = head;
    E result = elements[head];
    if (result == null)//null值意味着deque为空
        return null;
    elements[h] = null;//let GC work
    head = (head + 1) & (elements.length - 1);//下标越界处理
    return result;
}
2
3
4
5
6
7
8
9
2
3
4
5
6
7
8
9
# pollLast()
pollLast()的作用是删除并返回Deque尾端元素,也即是tail位置前面的那个元素。
public E pollLast() {
    int t = (tail - 1) & (elements.length - 1);//tail的上一个位置是最后一个元素
    E result = elements[t];
    if (result == null)//null值意味着deque为空
        return null;
    elements[t] = null;//let GC work
    tail = t;
    return result;
}
2
3
4
5
6
7
8
9
2
3
4
5
6
7
8
9
# peekFirst()
peekFirst()的作用是返回但不删除Deque首端元素,也即是head位置处的元素,直接返回elements[head]即可。
public E peekFirst() {
    return elements[head]; // elements[head] is null if deque empty
}
2
3
2
3
# peekLast()
peekLast()的作用是返回但不删除Deque尾端元素,也即是tail位置前面的那个元素。
public E peekLast() {
    return elements[(tail - 1) & (elements.length - 1)];
}
2
3
2
3
# PriorityQueue
# 概述
前面以Java ArrayDeque为例讲解了Stack和Queue,其实还有一种特殊的队列叫做PriorityQueue,即优先队列。优先队列的作用是能保证每次取出的元素都是队列中权值最小的(Java的优先队列每次取最小元素,C++的优先队列每次取最大元素)。这里牵涉到了大小关系,元素大小的评判可以通过元素本身的自然顺序(natural ordering),也可以通过构造时传入的比较器(Comparator,类似于C++的仿函数)。
Java中PriorityQueue实现了Queue接口,不允许放入null元素;其通过堆实现,具体说是通过完全二叉树(complete binary tree)实现的小顶堆(任意一个非叶子节点的权值,都不大于其左右子节点的权值),也就意味着可以通过数组来作为**PriorityQueue**的底层实现。
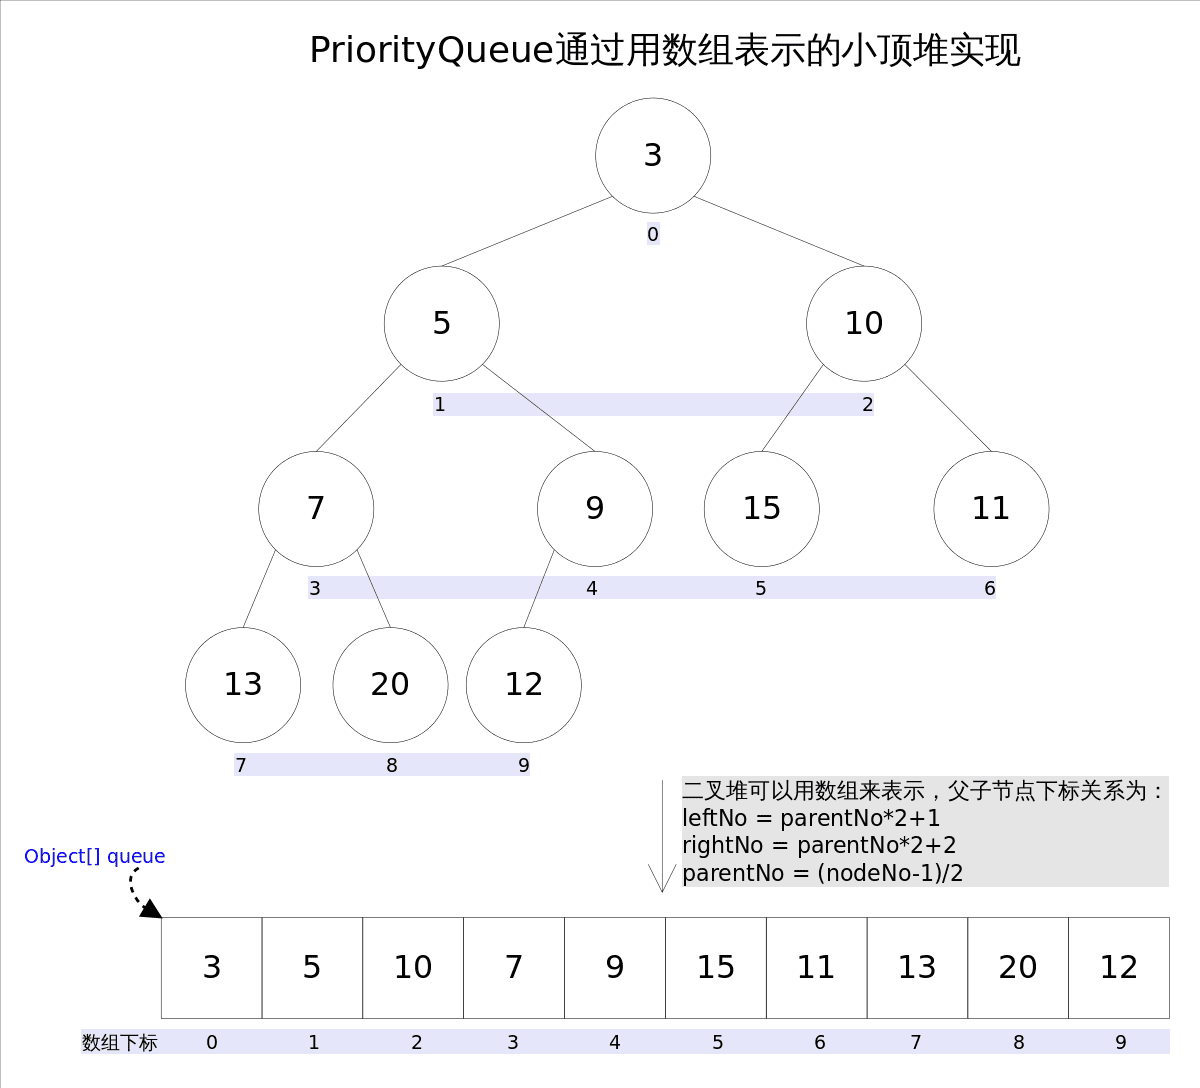
上图中我们给每个元素按照层序遍历的方式进行了编号,如果你足够细心,会发现父节点和子节点的编号是有联系的,更确切的说父子节点的编号之间有如下关系:
leftNo = parentNo*2+1rightNo = parentNo*2+2parentNo = (nodeNo-1)/2
通过上述三个公式,可以轻易计算出某个节点的父节点以及子节点的下标。这也就是为什么可以直接用数组来存储堆的原因。
PriorityQueue的peek()和element操作是常数时间,add(), offer(), 无参数的remove()以及poll()方法的时间复杂度都是log(N)。
# 方法剖析
# add()和offer()
add(E e)和offer(E e)的语义相同,都是向优先队列中插入元素,只是Queue接口规定二者对插入失败时的处理不同,前者在插入失败时抛出异常,后则则会返回false。对于PriorityQueue这两个方法其实没什么差别。
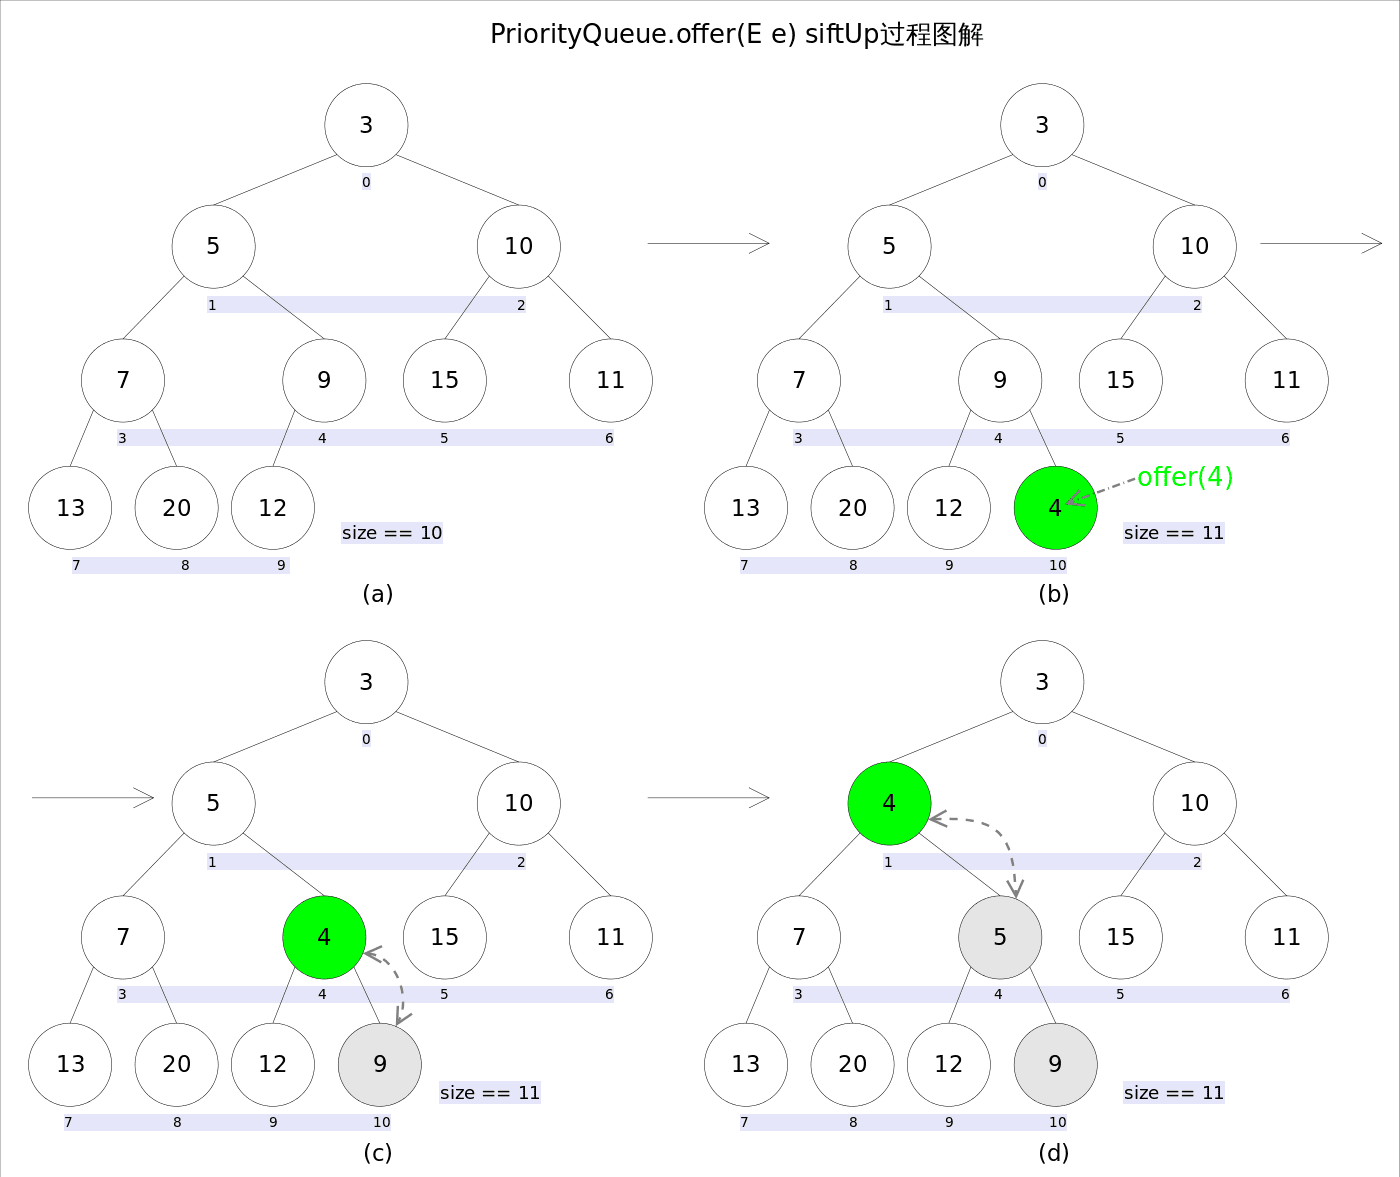
新加入的元素可能会破坏小顶堆的性质,因此需要进行必要的调整。
//offer(E e)
public boolean offer(E e) {
    if (e == null)//不允许放入null元素
        throw new NullPointerException();
    modCount++;
    int i = size;
    if (i >= queue.length)
        grow(i + 1);//自动扩容
    size = i + 1;
    if (i == 0)//队列原来为空,这是插入的第一个元素
        queue[0] = e;
    else
        siftUp(i, e);//调整
    return true;
}
2
3
4
5
6
7
8
9
10
11
12
13
14
15
2
3
4
5
6
7
8
9
10
11
12
13
14
15
上述代码中,扩容函数grow()类似于ArrayList里的grow()函数,就是再申请一个更大的数组,并将原数组的元素复制过去,这里不再赘述。需要注意的是siftUp(int k, E x)方法,该方法用于插入元素x并维持堆的特性。其调整过程类似下图:
//siftUp()
private void siftUp(int k, E x) {
    while (k > 0) {
        int parent = (k - 1) >>> 1;//parentNo = (nodeNo-1)/2
        Object e = queue[parent];
        if (comparator.compare(x, (E) e) >= 0)//调用比较器的比较方法
            break;
        queue[k] = e;
        k = parent;
    }
    queue[k] = x;
}
2
3
4
5
6
7
8
9
10
11
12
2
3
4
5
6
7
8
9
10
11
12
新加入的元素x可能会破坏小顶堆的性质,因此需要进行调整。调整的过程为 : 从k指定的位置开始,将**x**逐层与当前点的**parent**进行比较并交换,直到满足**x >= queue[parent]**为止。注意这里的比较可以是元素的自然顺序,也可以是依靠比较器的顺序。
# element()和peek()
element()和peek()的语义完全相同,都是获取但不删除队首元素,也就是队列中权值最小的那个元素,二者唯一的区别是当方法失败时前者抛出异常,后者返回null。根据小顶堆的性质,堆顶那个元素就是全局最小的那个;由于堆用数组表示,根据下标关系,0下标处的那个元素既是堆顶元素。所以直接返回数组**0**下标处的那个元素即可。
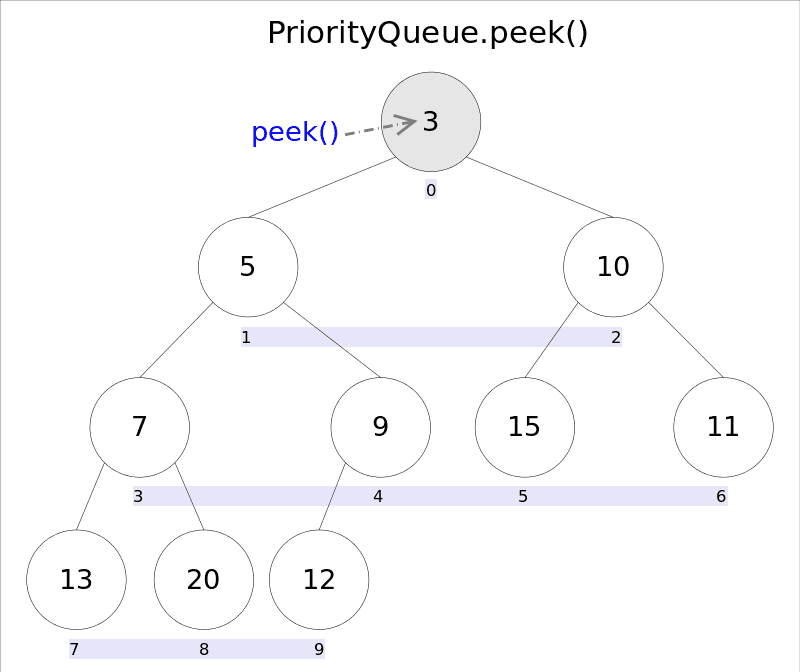
//peek()
public E peek() {
    if (size == 0)
        return null;
    return (E) queue[0];//0下标处的那个元素就是最小的那个
}
2
3
4
5
6
2
3
4
5
6
# remove()和poll()
remove()和poll()方法的语义也完全相同,都是获取并删除队首元素,区别是当方法失败时前者抛出异常,后者返回null。由于删除操作会改变队列的结构,为维护小顶堆的性质,需要进行必要的调整,调整示例图:
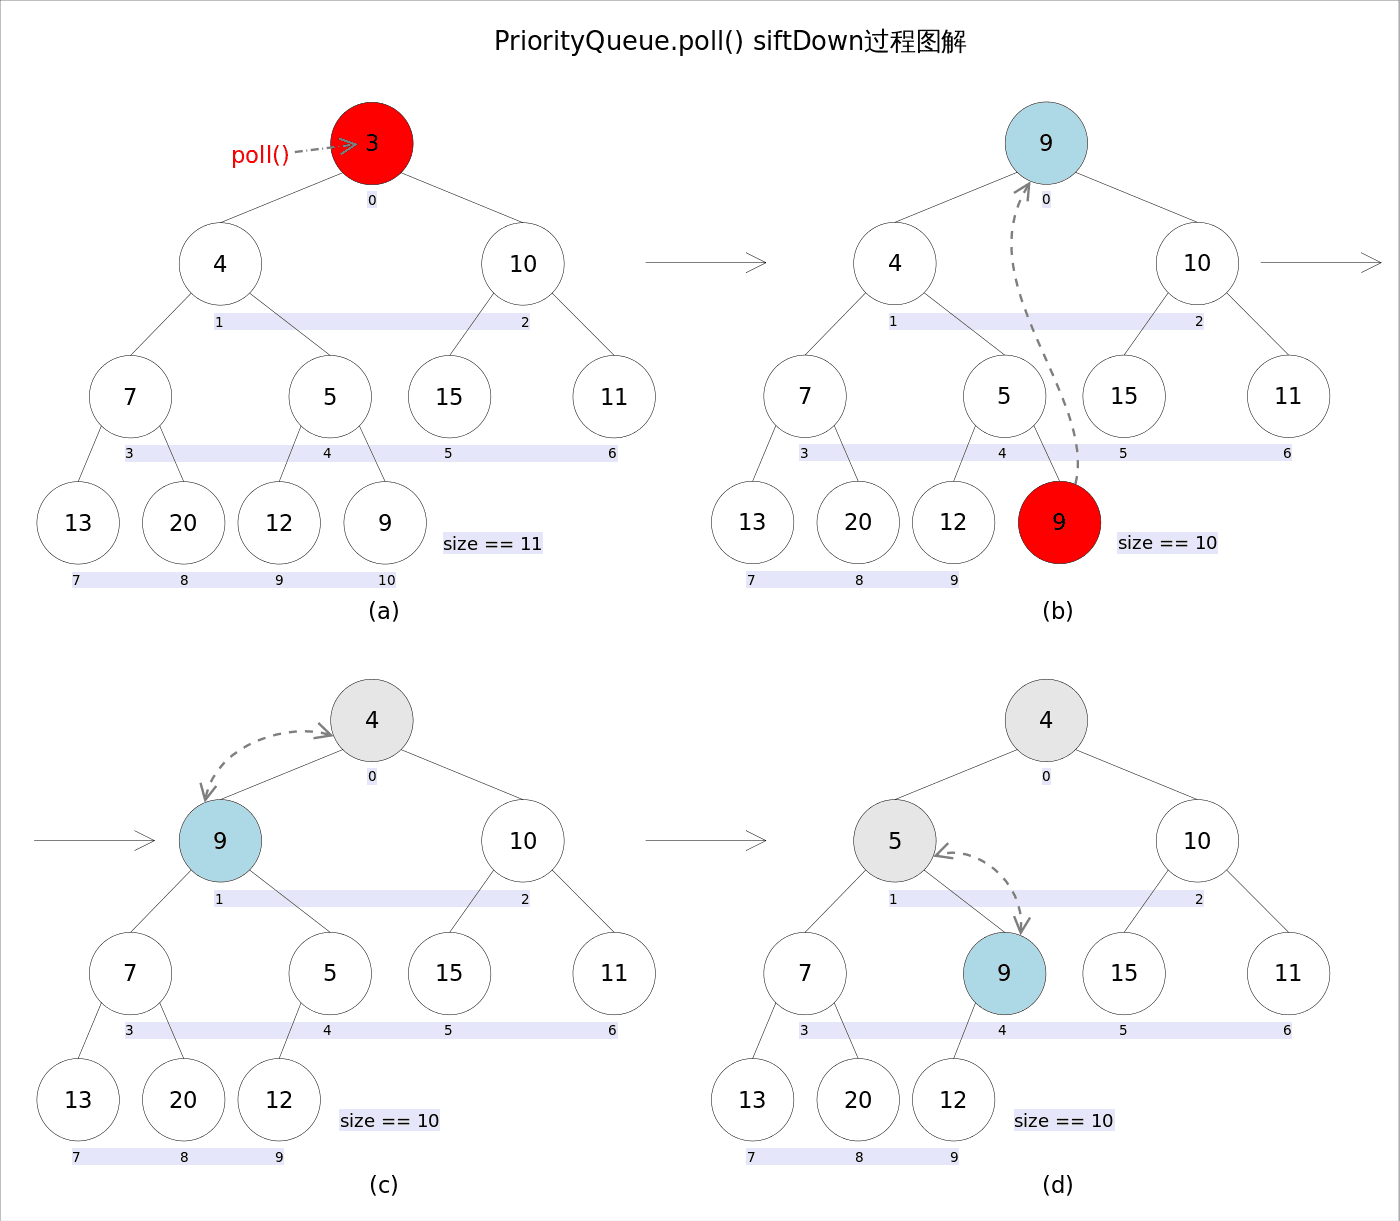
上述代码首先记录0下标处的元素,并用最后一个元素替换0下标位置的元素,之后调用siftDown()方法对堆进行调整,最后返回原来0下标处的那个元素(也就是最小的那个元素)。重点是siftDown(int k, E x)方法,该方法的作用是从**k**指定的位置开始,将**x**逐层向下与当前点的左右孩子中较小的那个交换,直到**x**小于或等于左右孩子中的任何一个为止。
//siftDown()
private void siftDown(int k, E x) {
    int half = size >>> 1;
    while (k < half) {
        //首先找到左右孩子中较小的那个,记录到c里,并用child记录其下标
        int child = (k << 1) + 1;//leftNo = parentNo*2+1
        Object c = queue[child];
        int right = child + 1;
        if (right < size &&
            comparator.compare((E) c, (E) queue[right]) > 0)
            c = queue[child = right];
        if (comparator.compare(x, (E) c) <= 0)
            break;
        queue[k] = c;//然后用c取代原来的值
        k = child;
    }
    queue[k] = x;
}
2
3
4
5
6
7
8
9
10
11
12
13
14
15
16
17
18
2
3
4
5
6
7
8
9
10
11
12
13
14
15
16
17
18
# remove(Object o)
remove(Object o)方法用于删除队列中跟o相等的某一个元素(如果有多个相等,只删除一个),该方法不是Queue接口内的方法,而是Collection接口的方法。由于删除操作会改变队列结构,所以要进行调整;又由于删除元素的位置可能是任意的,所以调整过程比其它函数稍加繁琐。
具体来说,remove(Object o)可以分为2种情况:
- 删除的是最后一个元素。直接删除即可,不需要调整。
- 删除的不是最后一个元素,从删除点开始以最后一个元素为参照调用一次
siftDown()即可。此处不再赘述。
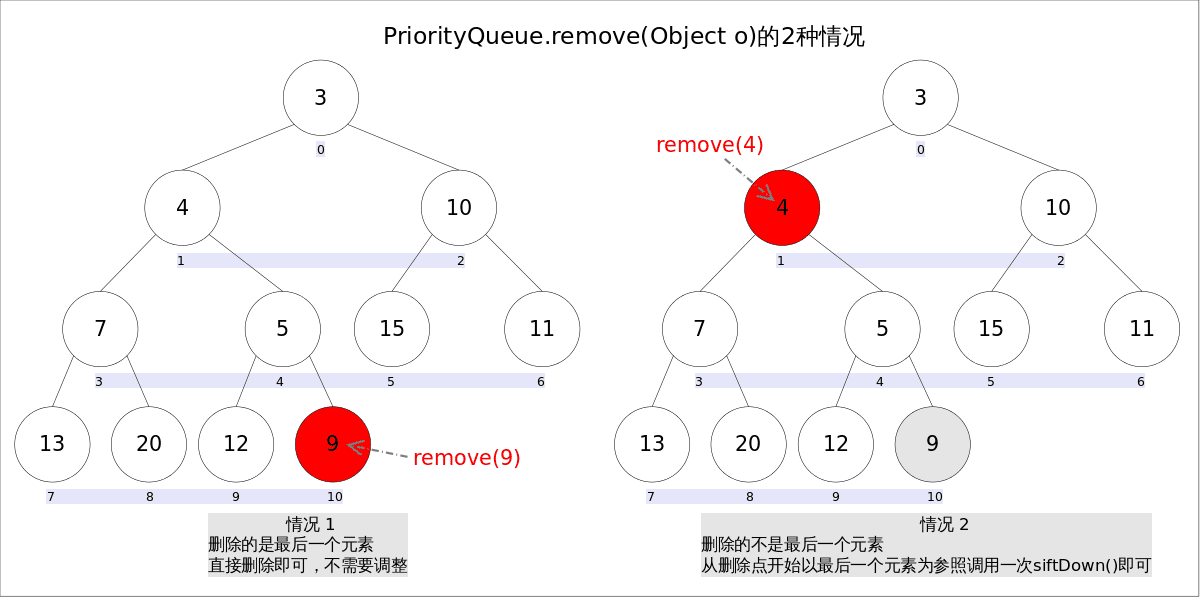
具体代码如下:
//remove(Object o)
public boolean remove(Object o) {
	//通过遍历数组的方式找到第一个满足o.equals(queue[i])元素的下标
    int i = indexOf(o);
    if (i == -1)
        return false;
    int s = --size;
    if (s == i) //情况1
        queue[i] = null;
    else {
        E moved = (E) queue[s];
        queue[s] = null;
        siftDown(i, moved);//情况2
        ......
    }
    return true;
}
2
3
4
5
6
7
8
9
10
11
12
13
14
15
16
17
2
3
4
5
6
7
8
9
10
11
12
13
14
15
16
17
# 参考
- 深入理解Java PriorityQueue 结合源码对PriorityQueue进行讲解 http://www.cnblogs.com/CarpenterLee/p/5488070.html (opens new window)
# TreeSet & TreeMap
# 总体介绍
之所以把TreeSet和TreeMap放在一起讲解,是因为二者在Java里有着相同的实现,前者仅仅是对后者做了一层包装,也就是说**TreeSet**里面有一个**TreeMap**(适配器模式)。因此本文将重点分析TreeMap。
Java TreeMap实现了SortedMap接口,也就是说会按照key的大小顺序对Map中的元素进行排序,key大小的评判可以通过其本身的_自然顺序(natural ordering)_,也可以通过构造时传入的比较器(Comparator)。
**TreeMap**底层通过_红黑树(Red-Black tree)_实现,也就意味着containsKey(), get(), put(), remove()都有着log(n)的时间复杂度。其具体算法实现参照了《算法导论》。
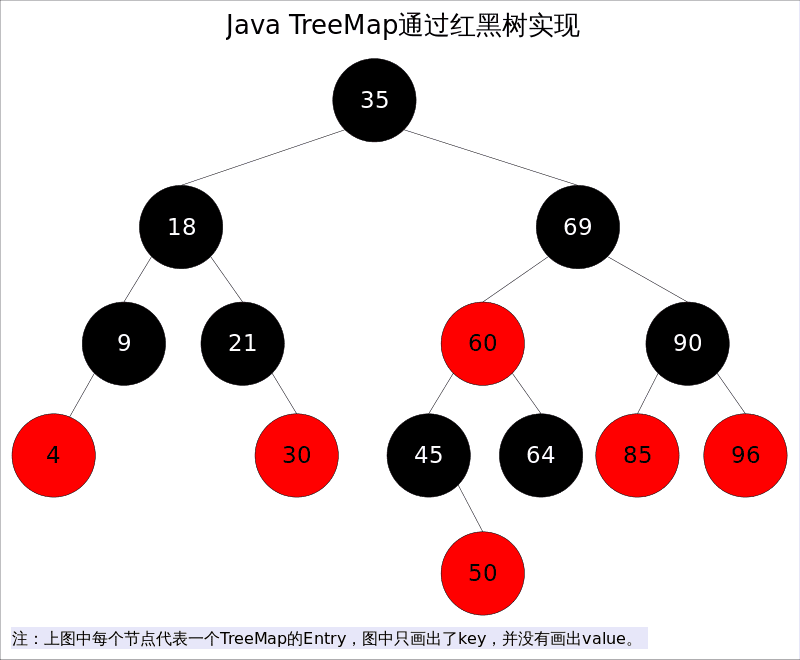
出于性能原因,TreeMap是_非同步的(not synchronized)_,如果需要在多线程环境使用,需要程序员手动同步;或者通过如下方式将TreeMap包装成(wrapped)同步的:
SortedMap m = Collections.synchronizedSortedMap(new TreeMap(...));
红黑树是一种近似平衡的二叉查找树,它能够确保任何一个节点的左右子树的高度差不会超过二者中较低那个的一倍。具体来说,红黑树是满足如下条件的_二叉查找树(binary search tree)_:
- 每个节点要么是红色,要么是黑色。
- 根节点必须是黑色
- 红色节点不能连续(也即是,红色节点的孩子和父亲都不能是红色)。
- 对于每个节点,从该点至
null(树尾端)的任何路径,都含有相同个数的黑色节点。
在树的结构发生改变时(插入或者删除操作),往往会破坏上述_条件3_或_条件4_,需要通过调整使得查找树重新满足红黑树的约束条件。
# 预备知识
前文说到当查找树的结构发生改变时,红黑树的约束条件可能被破坏,需要通过调整使得查找树重新满足红黑树的约束条件。调整可以分为两类: 一类是颜色调整,即改变某个节点的颜色;另一类是结构调整,即改变检索树的结构关系。结构调整过程包含两个基本操作** : 左旋(Rotate Left),右旋(RotateRight)**。
# 左旋
左旋的过程是将x的右子树绕x逆时针旋转,使得x的右子树成为x的父亲,同时修改相关节点的引用。旋转之后,二叉查找树的属性仍然满足。
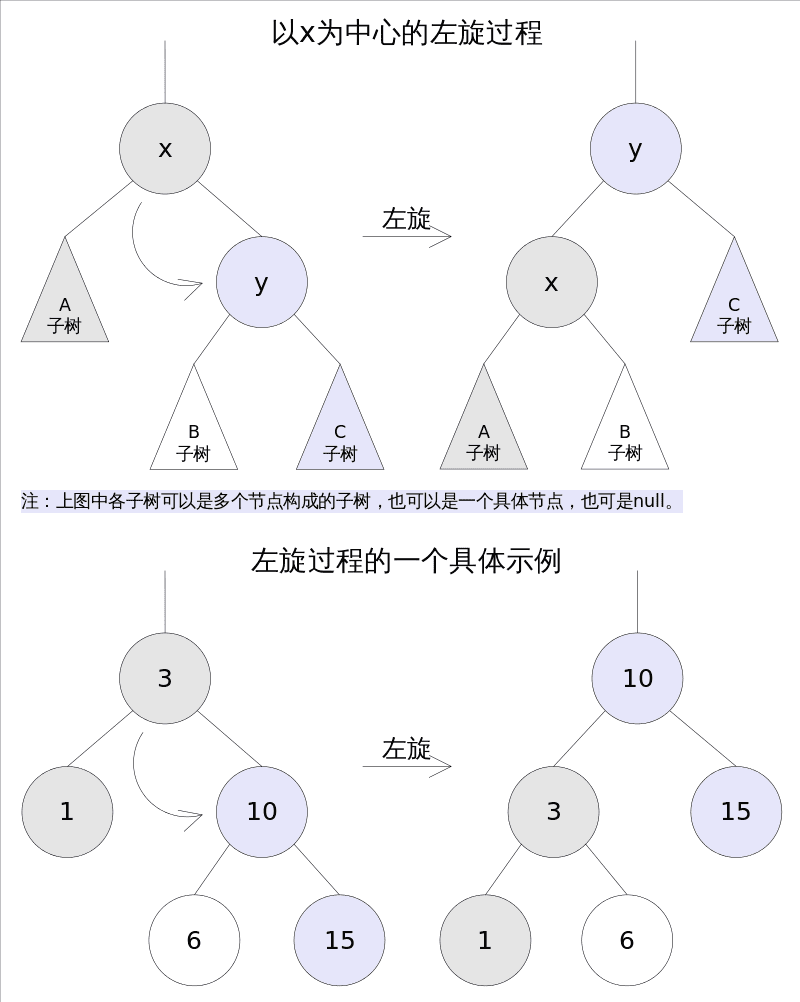
TreeMap中左旋代码如下:
//Rotate Left
private void rotateLeft(Entry<K,V> p) {
    if (p != null) {
        Entry<K,V> r = p.right;
        p.right = r.left;
        if (r.left != null)
            r.left.parent = p;
        r.parent = p.parent;
        if (p.parent == null)
            root = r;
        else if (p.parent.left == p)
            p.parent.left = r;
        else
            p.parent.right = r;
        r.left = p;
        p.parent = r;
    }
}
2
3
4
5
6
7
8
9
10
11
12
13
14
15
16
17
18
2
3
4
5
6
7
8
9
10
11
12
13
14
15
16
17
18
# 右旋
右旋的过程是将x的左子树绕x顺时针旋转,使得x的左子树成为x的父亲,同时修改相关节点的引用。旋转之后,二叉查找树的属性仍然满足。
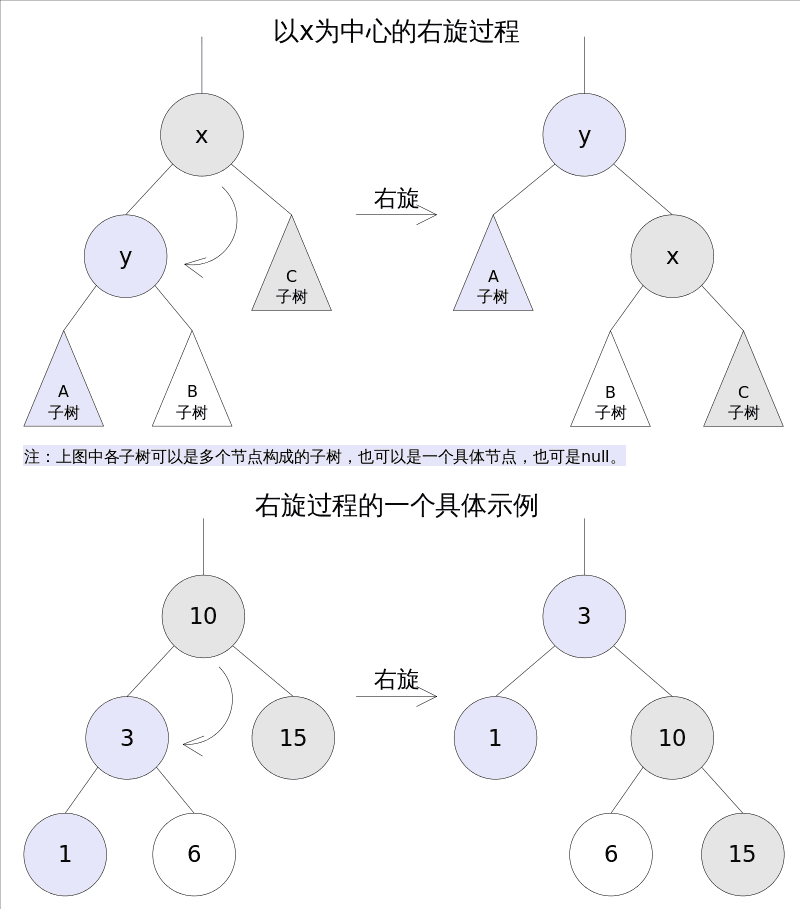
TreeMap中右旋代码如下:
//Rotate Right
private void rotateRight(Entry<K,V> p) {
    if (p != null) {
        Entry<K,V> l = p.left;
        p.left = l.right;
        if (l.right != null) l.right.parent = p;
        l.parent = p.parent;
        if (p.parent == null)
            root = l;
        else if (p.parent.right == p)
            p.parent.right = l;
        else p.parent.left = l;
        l.right = p;
        p.parent = l;
    }
}
2
3
4
5
6
7
8
9
10
11
12
13
14
15
16
2
3
4
5
6
7
8
9
10
11
12
13
14
15
16
# 寻找节点后继
对于一棵二叉查找树,给定节点t,其后继(树中比大于t的最小的那个元素)可以通过如下方式找到:
t的右子树不空,则t的后继是其右子树中最小的那个元素。t的右孩子为空,则t的后继是其第一个向左走的祖先。
后继节点在红黑树的删除操作中将会用到。
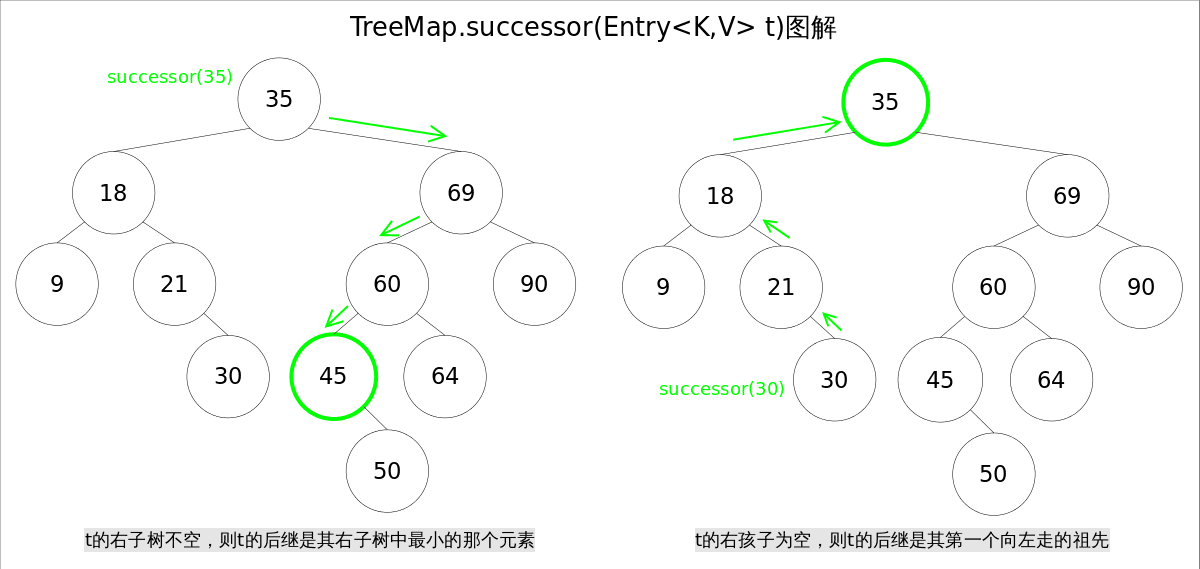
TreeMap中寻找节点后继的代码如下:
// 寻找节点后继函数successor()
static <K,V> TreeMap.Entry<K,V> successor(Entry<K,V> t) {
    if (t == null)
        return null;
    else if (t.right != null) {// 1. t的右子树不空,则t的后继是其右子树中最小的那个元素
        Entry<K,V> p = t.right;
        while (p.left != null)
            p = p.left;
        return p;
    } else {// 2. t的右孩子为空,则t的后继是其第一个向左走的祖先
        Entry<K,V> p = t.parent;
        Entry<K,V> ch = t;
        while (p != null && ch == p.right) {
            ch = p;
            p = p.parent;
        }
        return p;
    }
}
2
3
4
5
6
7
8
9
10
11
12
13
14
15
16
17
18
19
2
3
4
5
6
7
8
9
10
11
12
13
14
15
16
17
18
19
# 方法剖析
# get()
get(Object key)方法根据指定的key值返回对应的value,该方法调用了getEntry(Object key)得到相应的entry,然后返回entry.value。因此getEntry()是算法的核心。算法思想是根据key的自然顺序(或者比较器顺序)对二叉查找树进行查找,直到找到满足k.compareTo(p.key) == 0的entry。
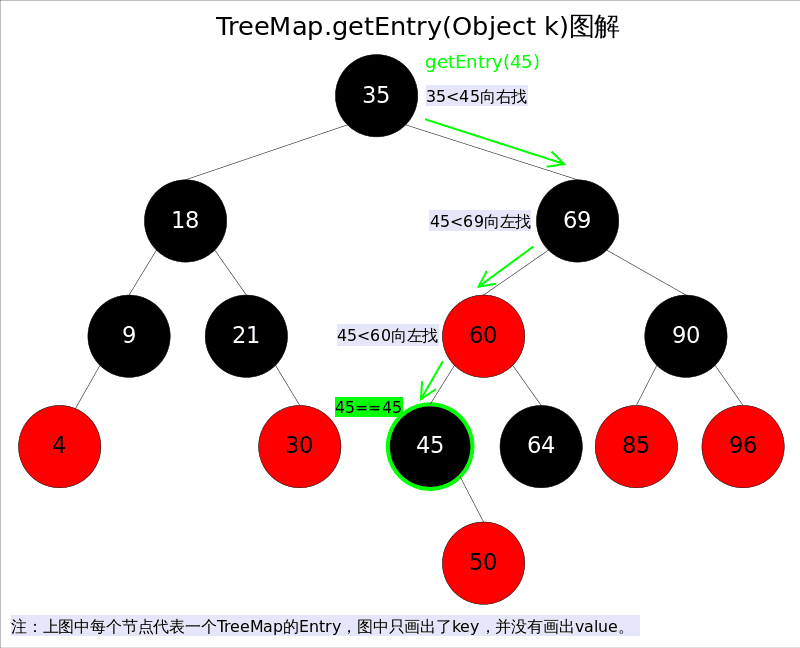
具体代码如下:
//getEntry()方法
final Entry<K,V> getEntry(Object key) {
    ......
    if (key == null)//不允许key值为null
        throw new NullPointerException();
    Comparable<? super K> k = (Comparable<? super K>) key;//使用元素的自然顺序
    Entry<K,V> p = root;
    while (p != null) {
        int cmp = k.compareTo(p.key);
        if (cmp < 0)//向左找
            p = p.left;
        else if (cmp > 0)//向右找
            p = p.right;
        else
            return p;
    }
    return null;
}
2
3
4
5
6
7
8
9
10
11
12
13
14
15
16
17
18
2
3
4
5
6
7
8
9
10
11
12
13
14
15
16
17
18
# put()
put(K key, V value)方法是将指定的<key, value>对添加到map里。
该方法首先会对map做一次查找,看是否包含该元组,如果已经包含则直接返回,查找过程类似于getEntry()方法;如果没有找到则会在红黑树中插入新的entry,如果插入之后破坏了红黑树的约束条件,还需要进行调整(旋转,改变某些节点的颜色)。
public V put(K key, V value) {
	......
    int cmp;
    Entry<K,V> parent;
    if (key == null)
        throw new NullPointerException();
    Comparable<? super K> k = (Comparable<? super K>) key;//使用元素的自然顺序
    do {
        parent = t;
        cmp = k.compareTo(t.key);
        if (cmp < 0) t = t.left;//向左找
        else if (cmp > 0) t = t.right;//向右找
        else return t.setValue(value);
    } while (t != null);
    Entry<K,V> e = new Entry<>(key, value, parent);//创建并插入新的entry
    if (cmp < 0) parent.left = e;
    else parent.right = e;
    fixAfterInsertion(e);//调整
    size++;
    return null;
}
2
3
4
5
6
7
8
9
10
11
12
13
14
15
16
17
18
19
20
21
2
3
4
5
6
7
8
9
10
11
12
13
14
15
16
17
18
19
20
21
上述代码的插入部分并不难理解:首先在红黑树上找到合适的位置,然后创建新的entry并插入(当然,新插入的节点一定是树的叶子)。难点是调整函数fixAfterInsertion(),前面已经说过,调整往往需要 1)改变某些节点的颜色;2)对某些节点进行旋转。
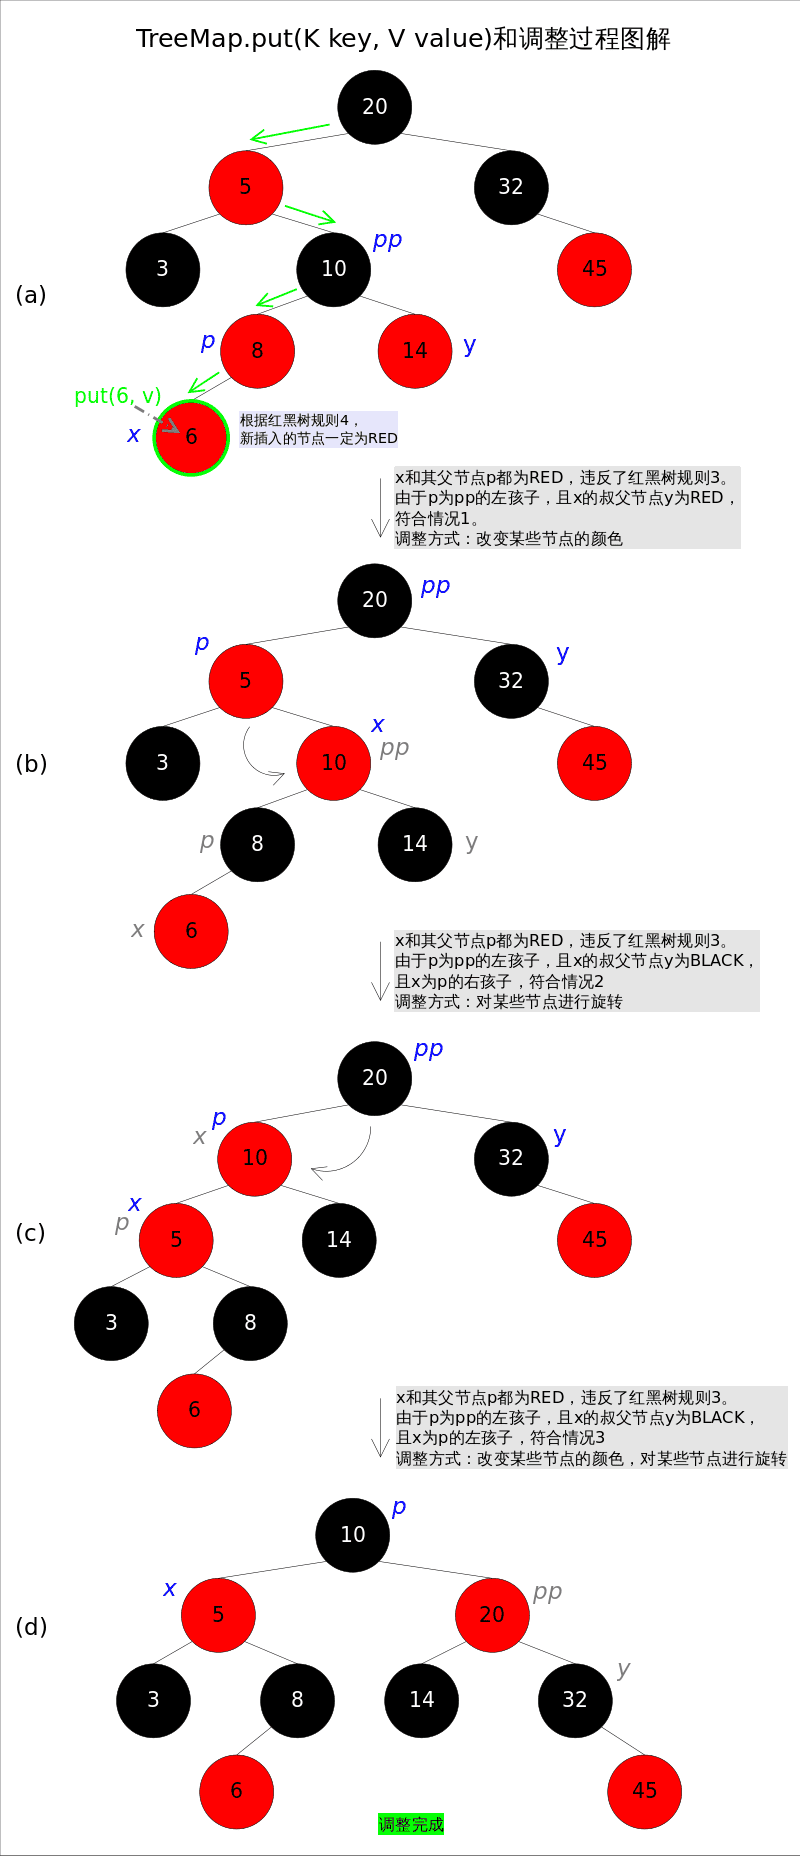
调整函数fixAfterInsertion()的具体代码如下,其中用到了上文中提到的rotateLeft()和rotateRight()函数。通过代码我们能够看到,情况2 其实是落在 情况3 内的。情况4~情况6 跟前三种情况是对称的,因此图解中并没有画出后三种情况,读者可以参考代码自行理解。
//红黑树调整函数fixAfterInsertion()
private void fixAfterInsertion(Entry<K,V> x) {
    x.color = RED;
    while (x != null && x != root && x.parent.color == RED) {
        if (parentOf(x) == leftOf(parentOf(parentOf(x)))) {
            Entry<K,V> y = rightOf(parentOf(parentOf(x)));
            if (colorOf(y) == RED) {
                setColor(parentOf(x), BLACK);              // 情况1
                setColor(y, BLACK);                        // 情况1
                setColor(parentOf(parentOf(x)), RED);      // 情况1
                x = parentOf(parentOf(x));                 // 情况1
            } else {
                if (x == rightOf(parentOf(x))) {
                    x = parentOf(x);                       // 情况2
                    rotateLeft(x);                         // 情况2
                }
                setColor(parentOf(x), BLACK);              // 情况3
                setColor(parentOf(parentOf(x)), RED);      // 情况3
                rotateRight(parentOf(parentOf(x)));        // 情况3
            }
        } else {
            Entry<K,V> y = leftOf(parentOf(parentOf(x)));
            if (colorOf(y) == RED) {
                setColor(parentOf(x), BLACK);              // 情况4
                setColor(y, BLACK);                        // 情况4
                setColor(parentOf(parentOf(x)), RED);      // 情况4
                x = parentOf(parentOf(x));                 // 情况4
            } else {
                if (x == leftOf(parentOf(x))) {
                    x = parentOf(x);                       // 情况5
                    rotateRight(x);                        // 情况5
                }
                setColor(parentOf(x), BLACK);              // 情况6
                setColor(parentOf(parentOf(x)), RED);      // 情况6
                rotateLeft(parentOf(parentOf(x)));         // 情况6
            }
        }
    }
    root.color = BLACK;
}
2
3
4
5
6
7
8
9
10
11
12
13
14
15
16
17
18
19
20
21
22
23
24
25
26
27
28
29
30
31
32
33
34
35
36
37
38
39
40
2
3
4
5
6
7
8
9
10
11
12
13
14
15
16
17
18
19
20
21
22
23
24
25
26
27
28
29
30
31
32
33
34
35
36
37
38
39
40
# remove()
remove(Object key)的作用是删除key值对应的entry,该方法首先通过上文中提到的getEntry(Object key)方法找到key值对应的entry,然后调用deleteEntry(Entry<K,V> entry)删除对应的entry。由于删除操作会改变红黑树的结构,有可能破坏红黑树的约束条件,因此有可能要进行调整。
getEntry()函数前面已经讲解过,这里重点放deleteEntry()上,该函数删除指定的entry并在红黑树的约束被破坏时进行调用fixAfterDeletion(Entry<K,V> x)进行调整。
由于红黑树是一棵增强版的二叉查找树,红黑树的删除操作跟普通二叉查找树的删除操作也就非常相似,唯一的区别是红黑树在节点删除之后可能需要进行调整。现在考虑一棵普通二叉查找树的删除过程,可以简单分为两种情况:
- 删除点p的左右子树都为空,或者只有一棵子树非空。
- 删除点p的左右子树都非空。
对于上述 情况1 ,处理起来比较简单,直接将p删除(左右子树都为空时),或者用非空子树替代p(只有一棵子树非空时);对于 情况2 ,可以用p的后继s(树中大于x的最小的那个元素)代替p,然后使用 情况1 删除s(此时s一定满足 情况1 可以画画看)。
基于以上逻辑,红黑树的节点删除函数deleteEntry()代码如下:
// 红黑树entry删除函数deleteEntry()
private void deleteEntry(Entry<K,V> p) {
    modCount++;
    size--;
    if (p.left != null && p.right != null) {// 2. 删除点p的左右子树都非空。
        Entry<K,V> s = successor(p);// 后继
        p.key = s.key;
        p.value = s.value;
        p = s;
    }
    Entry<K,V> replacement = (p.left != null ? p.left : p.right);
    if (replacement != null) {// 1. 删除点p只有一棵子树非空。
        replacement.parent = p.parent;
        if (p.parent == null)
            root = replacement;
        else if (p == p.parent.left)
            p.parent.left  = replacement;
        else
            p.parent.right = replacement;
        p.left = p.right = p.parent = null;
        if (p.color == BLACK)
            fixAfterDeletion(replacement);// 调整
    } else if (p.parent == null) {
        root = null;
    } else { // 1. 删除点p的左右子树都为空
        if (p.color == BLACK)
            fixAfterDeletion(p);// 调整
        if (p.parent != null) {
            if (p == p.parent.left)
                p.parent.left = null;
            else if (p == p.parent.right)
                p.parent.right = null;
            p.parent = null;
        }
    }
}
2
3
4
5
6
7
8
9
10
11
12
13
14
15
16
17
18
19
20
21
22
23
24
25
26
27
28
29
30
31
32
33
34
35
36
2
3
4
5
6
7
8
9
10
11
12
13
14
15
16
17
18
19
20
21
22
23
24
25
26
27
28
29
30
31
32
33
34
35
36
上述代码中占据大量代码行的,是用来修改父子节点间引用关系的代码,其逻辑并不难理解。
下面着重讲解删除后调整函数fixAfterDeletion()。首先请思考一下,删除了哪些点才会导致调整?只有删除点是BLACK的时候,才会触发调整函数,因为删除RED节点不会破坏红黑树的任何约束,而删除BLACK节点会破坏规则4。
跟上文中讲过的fixAfterInsertion()函数一样,这里也要分成若干种情况。记住,无论有多少情况,具体的调整操作只有两种: 1)改变某些节点的颜色,2)对某些节点进行旋转。
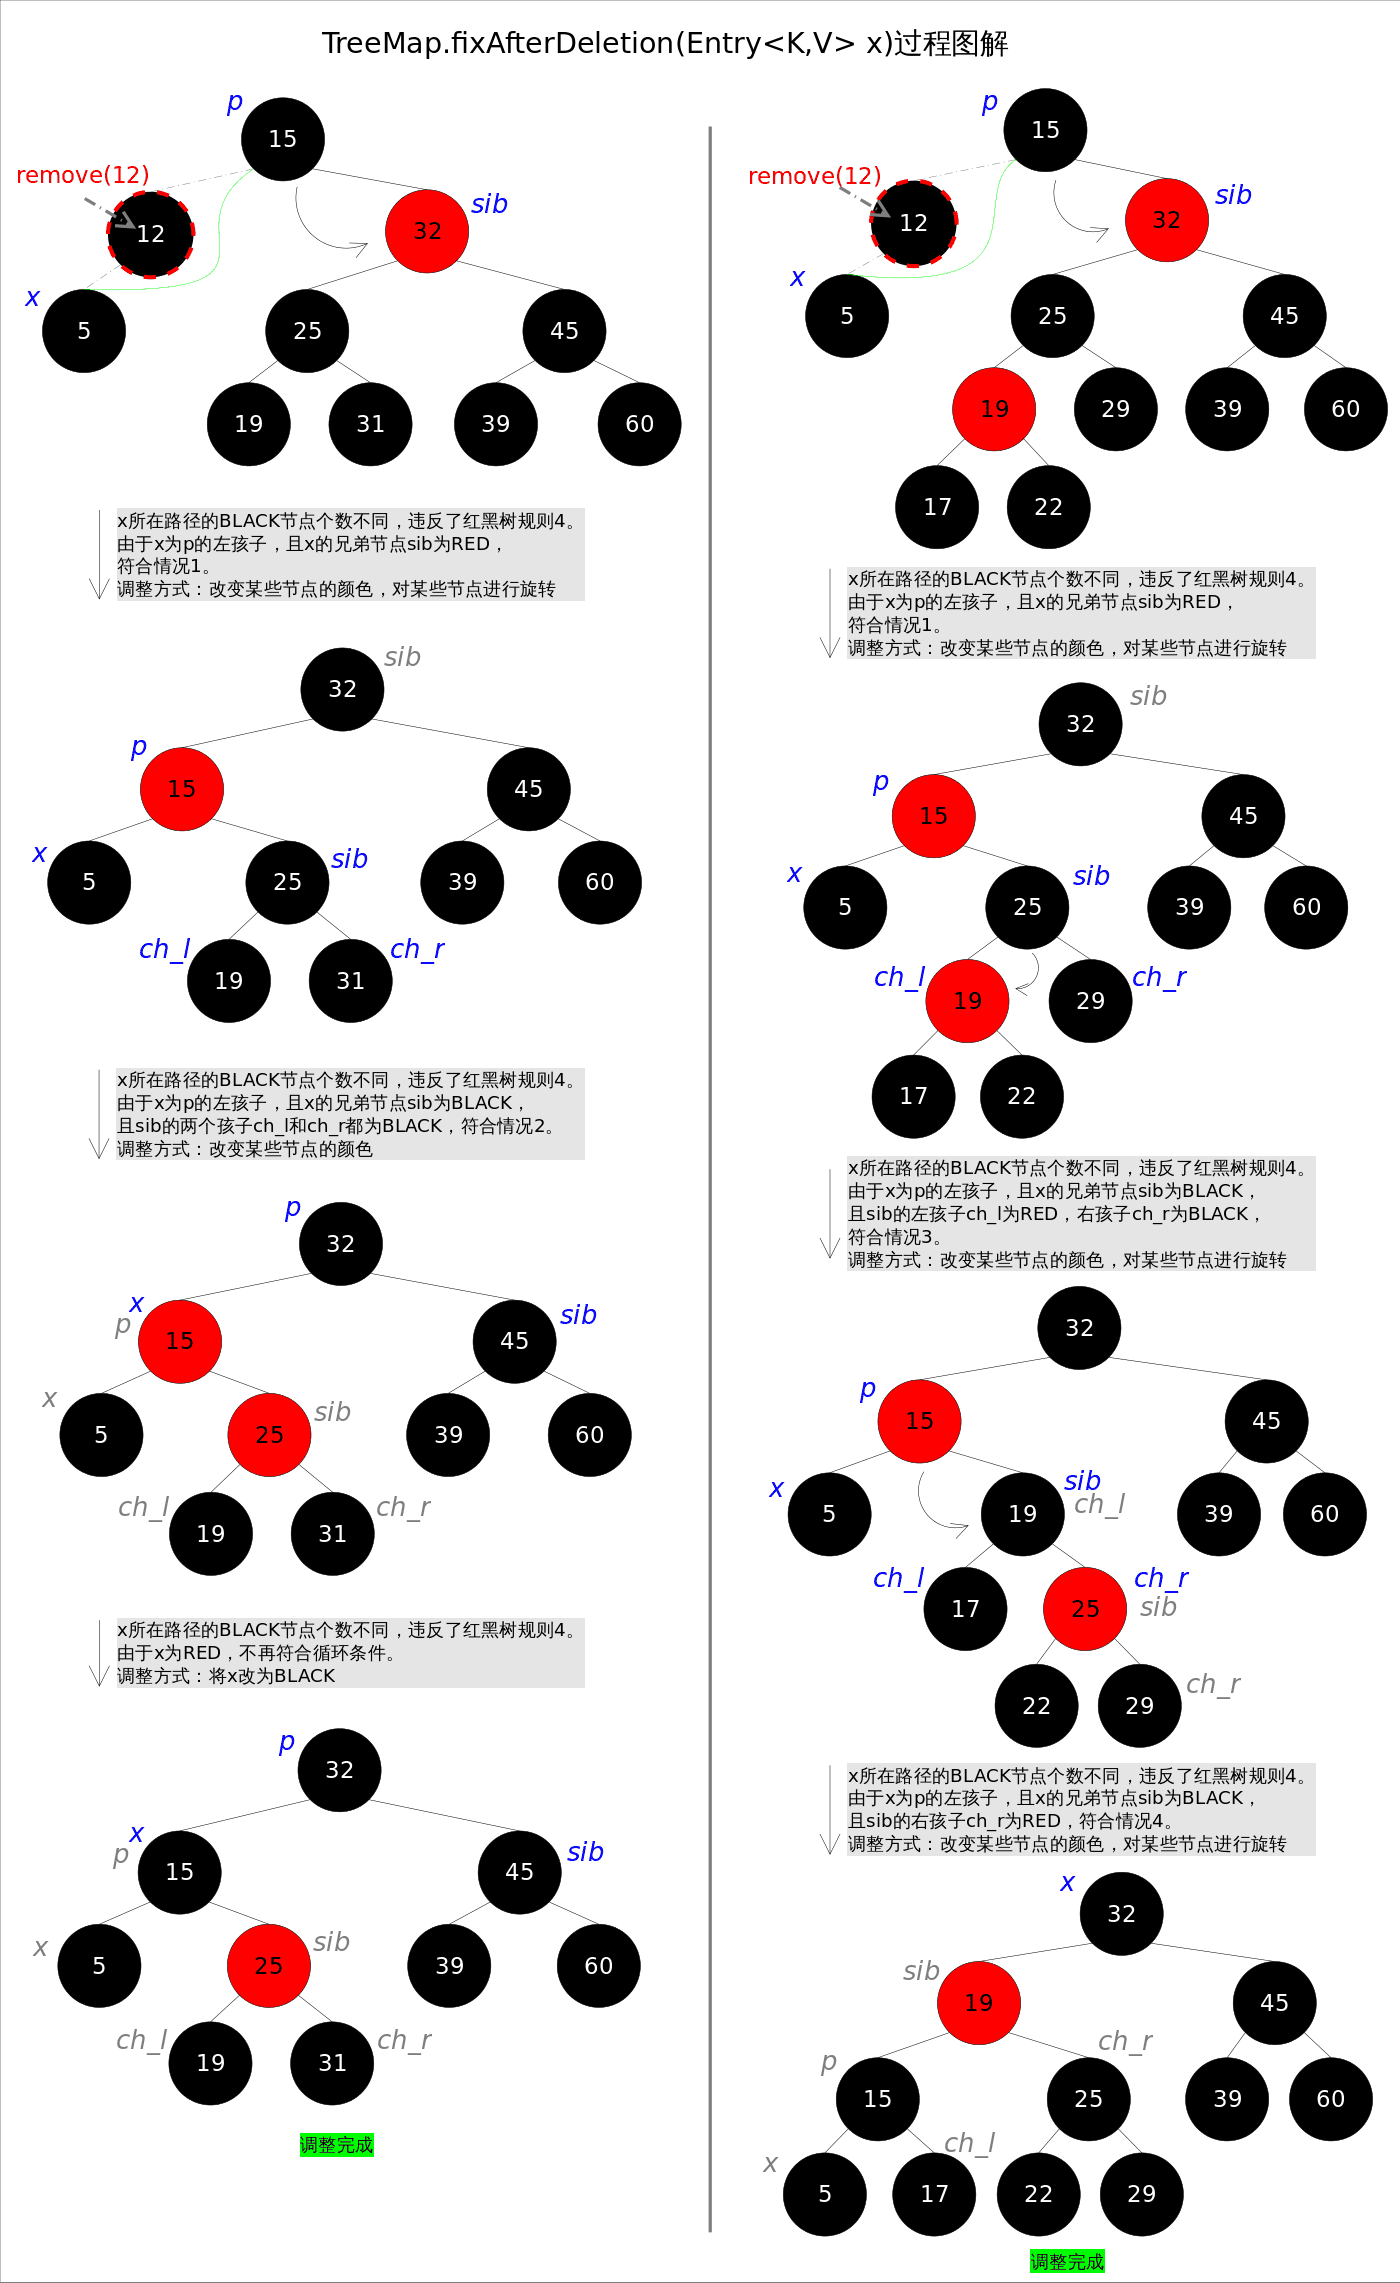
private void fixAfterDeletion(Entry<K,V> x) {
    while (x != root && colorOf(x) == BLACK) {
        if (x == leftOf(parentOf(x))) {
            Entry<K,V> sib = rightOf(parentOf(x));
            if (colorOf(sib) == RED) {
                setColor(sib, BLACK);                   // 情况1
                setColor(parentOf(x), RED);             // 情况1
                rotateLeft(parentOf(x));                // 情况1
                sib = rightOf(parentOf(x));             // 情况1
            }
            if (colorOf(leftOf(sib))  == BLACK &&
                colorOf(rightOf(sib)) == BLACK) {
                setColor(sib, RED);                     // 情况2
                x = parentOf(x);                        // 情况2
            } else {
                if (colorOf(rightOf(sib)) == BLACK) {
                    setColor(leftOf(sib), BLACK);       // 情况3
                    setColor(sib, RED);                 // 情况3
                    rotateRight(sib);                   // 情况3
                    sib = rightOf(parentOf(x));         // 情况3
                }
                setColor(sib, colorOf(parentOf(x)));    // 情况4
                setColor(parentOf(x), BLACK);           // 情况4
                setColor(rightOf(sib), BLACK);          // 情况4
                rotateLeft(parentOf(x));                // 情况4
                x = root;                               // 情况4
            }
        } else { // 跟前四种情况对称
            Entry<K,V> sib = leftOf(parentOf(x));
            if (colorOf(sib) == RED) {
                setColor(sib, BLACK);                   // 情况5
                setColor(parentOf(x), RED);             // 情况5
                rotateRight(parentOf(x));               // 情况5
                sib = leftOf(parentOf(x));              // 情况5
            }
            if (colorOf(rightOf(sib)) == BLACK &&
                colorOf(leftOf(sib)) == BLACK) {
                setColor(sib, RED);                     // 情况6
                x = parentOf(x);                        // 情况6
            } else {
                if (colorOf(leftOf(sib)) == BLACK) {
                    setColor(rightOf(sib), BLACK);      // 情况7
                    setColor(sib, RED);                 // 情况7
                    rotateLeft(sib);                    // 情况7
                    sib = leftOf(parentOf(x));          // 情况7
                }
                setColor(sib, colorOf(parentOf(x)));    // 情况8
                setColor(parentOf(x), BLACK);           // 情况8
                setColor(leftOf(sib), BLACK);           // 情况8
                rotateRight(parentOf(x));               // 情况8
                x = root;                               // 情况8
            }
        }
    }
    setColor(x, BLACK);
}
2
3
4
5
6
7
8
9
10
11
12
13
14
15
16
17
18
19
20
21
22
23
24
25
26
27
28
29
30
31
32
33
34
35
36
37
38
39
40
41
42
43
44
45
46
47
48
49
50
51
52
53
54
55
56
2
3
4
5
6
7
8
9
10
11
12
13
14
15
16
17
18
19
20
21
22
23
24
25
26
27
28
29
30
31
32
33
34
35
36
37
38
39
40
41
42
43
44
45
46
47
48
49
50
51
52
53
54
55
56
上述图解的总体思想是: 将 情况1 首先转换成 情况2 ,或者转换成 情况3 和 情况4。当然,该图解并不意味着调整过程一定是从 情况1 开始。通过后续代码我们还会发现几个有趣的规则: a)如果是由 情况1 之后紧接着进入的 情况2,那么 情况2 之后一定会退出循环(因为x为红色);b)一旦进入 情况3 和 情况4,一定会退出循环(因为x为root)。
删除后调整函数fixAfterDeletion()的具体代码如下,其中用到了上文中提到的rotateLeft()和rotateRight()函数。通过代码我们能够看到,情况3 其实是落在 情况4 内的。情况5~情况8 跟前四种情况是对称的,因此图解中并没有画出后四种情况,读者可以参考代码自行理解。
# TreeSet
前面已经说过TreeSet是对TreeMap的简单包装,对TreeSet的函数调用都会转换成合适的TreeMap方法,因此TreeSet的实现非常简单。这里不再赘述。
// TreeSet是对TreeMap的简单包装
public class TreeSet<E> extends AbstractSet<E>
implements NavigableSet<E>, Cloneable, java.io.Serializable
{
    ......
    private transient NavigableMap<E,Object> m;
    // Dummy value to associate with an Object in the backing Map
    private static final Object PRESENT = new Object();
    public TreeSet() {
        this.m = new TreeMap<E,Object>();// TreeSet里面有一个TreeMap
    }
    ......
    public boolean add(E e) {
        return m.put(e, PRESENT)==null;
    }
    ......
}
2
3
4
5
6
7
8
9
10
11
12
13
14
15
16
17
2
3
4
5
6
7
8
9
10
11
12
13
14
15
16
17
# HashSet & HashMap
TIP
之所以把HashSet和HashMap放在一起讲解,是因为二者在Java里有着相同的实现,前者仅仅是对后者做了一层包装,也就是说HashSet里面有一个HashMap(适配器模式)。因此本文将重点分析HashMap。
HashMap 主要用来存放键值对,它基于哈希表的 Map 接口实现,是常用的 Java 集合之一,是非线程安全的。
- JDK1.8 之前
HashMap由 数组+链表 组成的,数组是HashMap的主体,链表则是主要为了解决哈希冲突而存在的(“拉链法”解决冲突)。 - JDK1.8 以后的
HashMap由 数组+链表+红黑树 组成的。主要是在解决哈希冲突时有了较大的变化,当链表长度大于等于阈值(默认为 8)(将链表转换成红黑树前会判断,如果当前数组的长度小于 64,那么会选择先进行数组扩容,而不是转换为红黑树)时,将链表转化为红黑树,以减少搜索时间。
HashMap 默认的初始化大小为 16。之后每次扩充,容量变为原来的 2 倍。并且, HashMap 总是使用 2 的幂作为哈希表的大小。
# Java7 HashMap
# 概述
HashMap 实现了 Map 接口,即允许放入 key 为 null 的元素,也允许插入 value 为 null 的元素;除该类未实现同步外,其余跟Hashtable大致相同;
跟 TreeMap 不同,HashMap 容器不保证元素顺序,根据需要该容器可能会对元素重新哈希,元素的顺序也会被重新打散,因此不同时间迭代同一个HashMap 的顺序可能会不同。 根据对冲突的处理方式不同,哈希表有两种实现方式,一种 开放地址方式(Open addressing),另一种是 冲突链表方式(Separate chaining with linked lists)。Java7 HashMap 采用的是冲突链表方式。
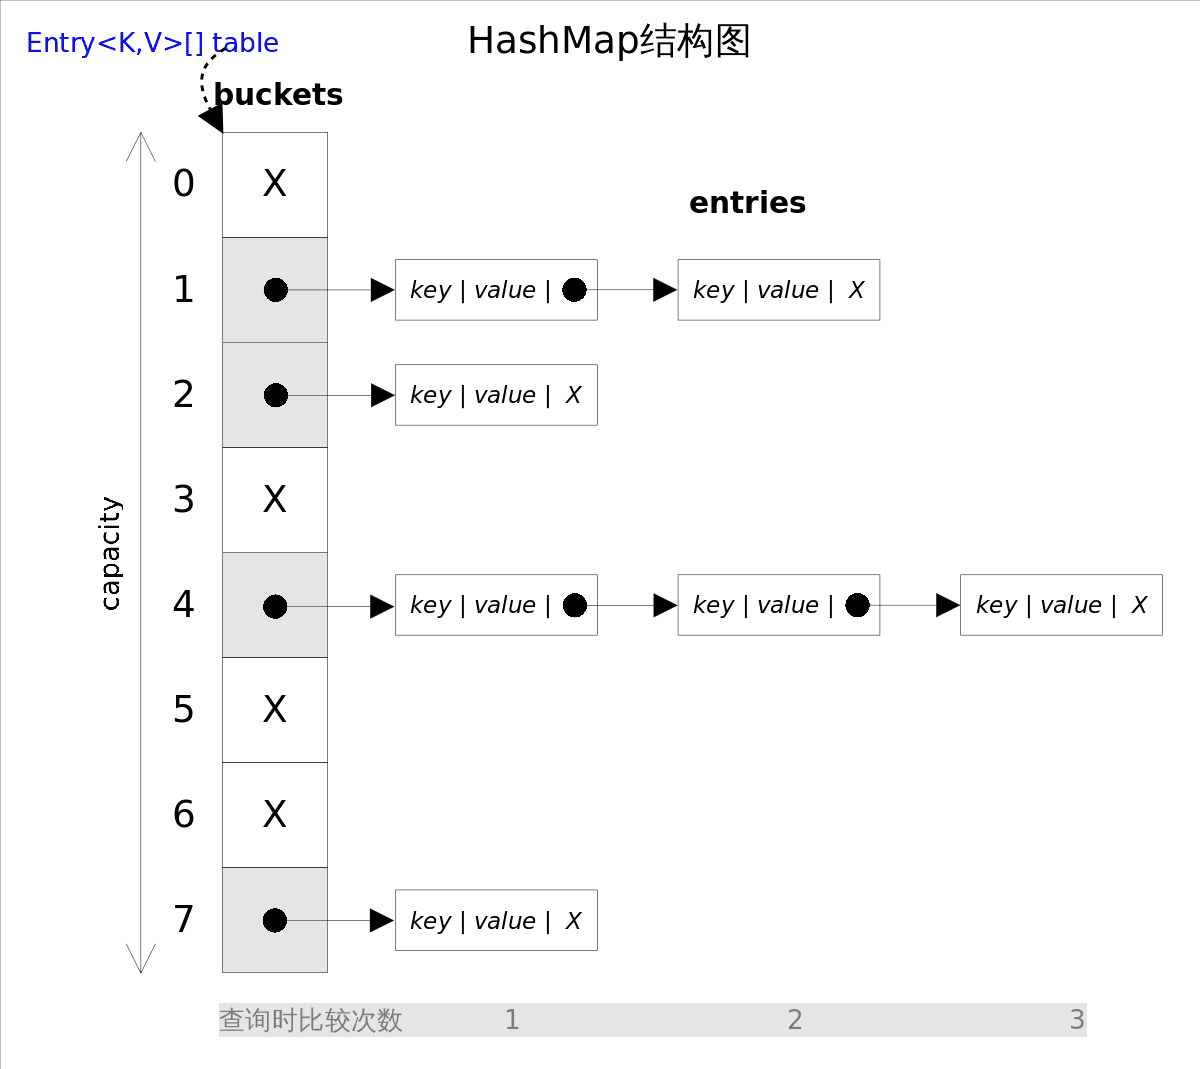
从上图容易看出,如果选择合适的哈希函数,put()和get()方法可以在常数时间内完成。但在对 HashMap 进行迭代时,需要遍历整个table以及后面跟的冲突链表。因此对于迭代比较频繁的场景,不宜将 HashMap 的初始大小设的过大。
有两个参数可以影响 HashMap 的性能: 初始容量(inital capacity) 和 负载系数(load factor) 。初始容量指定了初始 table 的大小,负载系数用来指定自动扩容的临界值。当 entry 的数量超过 capacity * load_factor 时,容器将自动扩容并重新哈希。对于插入元素较多的场景,将初始容量设大可以减少重新哈希的次数。
将对象放入到 HashMap 或 HashSet 中时,有两个方法需要特别关心: hashCode() 和 equals()。
hashCode()方法决定了对象会被放到哪个bucket里,当多个对象的哈希值冲突时,equals()方法决定了这些对象是否是“同一个对象”。
所以,如果要将自定义的对象放入到 HashMap 或 HashSet 中,需要@Override hashCode()和equals()方法。
# get()
get(Object key)方法根据指定的key值返回对应的value,该方法调用了getEntry(Object key)得到相应的entry,然后返回entry.getValue()。因此 getEntry() 是算法的核心。 算法思想是首先通过 hash() 函数得到对应bucket的下标,然后依次遍历冲突链表,通过 key.equals(k) 方法来判断是否是要找的那个 entry。

上图中hash(k)&(table.length-1)等价于hash(k)%table.length,原因是HashMap要求table.length必须是2的指数,因此table.length-1就是二进制低位全是1,跟hash(k)相与会将哈希值的高位全抹掉,剩下的就是余数了。
//getEntry()方法
final Entry<K,V> getEntry(Object key) {
	......
	int hash = (key == null) ? 0 : hash(key);
    for (Entry<K,V> e = table[hash&(table.length-1)];//得到冲突链表
         e != null; e = e.next) {//依次遍历冲突链表中的每个entry
        Object k;
        //依据equals()方法判断是否相等
        if (e.hash == hash &&
            ((k = e.key) == key || (key != null && key.equals(k))))
            return e;
    }
    return null;
}
2
3
4
5
6
7
8
9
10
11
12
13
14
2
3
4
5
6
7
8
9
10
11
12
13
14
TIP
这几天刚好在看计算机组成,想到了CPU Cache主存地址映射里的 直接映射,如图:

图中,主存地址高m位被分为 t位主存字块地址 + c位Cache字块地址 。起初我还不明白,为何用t位来存储主存地址(主存有 块,按推算,t位只能访问到 块),后来想想,前面是我想错了,其实主存地址就是 t+c=m 位来存储,图中划分为两部分是为了方便讲解而已,根据主存地址低c位来查找Cache对应块,根据主存地址高t位判断Cache存储块是否命中。

# put()
put(K key, V value)方法是将指定的key, value对添加到map里。该方法首先会对map做一次查找,看是否包含该元组,如果已经包含则直接返回,查找过程类似于getEntry()方法;如果没有找到,则会通过addEntry(int hash, K key, V value, int bucketIndex)方法插入新的entry,插入方式为头插法。

//addEntry()
void addEntry(int hash, K key, V value, int bucketIndex) {
    if ((size >= threshold) && (null != table[bucketIndex])) {
        resize(2 * table.length);//自动扩容,并重新哈希
        hash = (null != key) ? hash(key) : 0;
        bucketIndex = hash & (table.length-1);//hash%table.length
    }
    //在冲突链表头部插入新的entry
    Entry<K,V> e = table[bucketIndex];
    table[bucketIndex] = new Entry<>(hash, key, value, e);
    size++;
}
2
3
4
5
6
7
8
9
10
11
12
2
3
4
5
6
7
8
9
10
11
12
# remove()
remove(Object key)的作用是删除key值对应的entry,该方法的具体逻辑是在removeEntryForKey(Object key)里实现的。removeEntryForKey()方法会首先找到key值对应的entry,然后删除该entry(修改链表的相应引用)。查找过程跟getEntry()过程类似。

//removeEntryForKey()
final Entry<K,V> removeEntryForKey(Object key) {
	......
	int hash = (key == null) ? 0 : hash(key);
    int i = indexFor(hash, table.length);//hash&(table.length-1)
    Entry<K,V> prev = table[i];//得到冲突链表
    Entry<K,V> e = prev;
    while (e != null) {//遍历冲突链表
        Entry<K,V> next = e.next;
        Object k;
        if (e.hash == hash &&
            ((k = e.key) == key || (key != null && key.equals(k)))) {//找到要删除的entry
            modCount++; size--;
            if (prev == e) table[i] = next;//删除的是冲突链表的第一个entry
            else prev.next = next;
            return e;
        }
        prev = e; e = next;
    }
    return e;
}
2
3
4
5
6
7
8
9
10
11
12
13
14
15
16
17
18
19
20
21
2
3
4
5
6
7
8
9
10
11
12
13
14
15
16
17
18
19
20
21
# Java8 HashMap
Java8 对 HashMap 进行了一些修改,最大的不同就是利用了红黑树,所以其由 数组+链表+红黑树 组成。
根据 Java7 HashMap 的介绍,我们知道,查找的时候,根据 hash 值我们能够快速定位到数组的具体下标,但是之后的话,需要顺着链表一个个比较下去才能找到我们需要的,时间复杂度取决于链表的长度,为 O(n)。
为了降低这部分的开销,在 Java8 中,当链表中的元素达到了 8 个时,会将链表转换为红黑树,在这些位置进行查找的时候可以降低时间复杂度为 O(logN)。
来一张图简单示意一下吧:
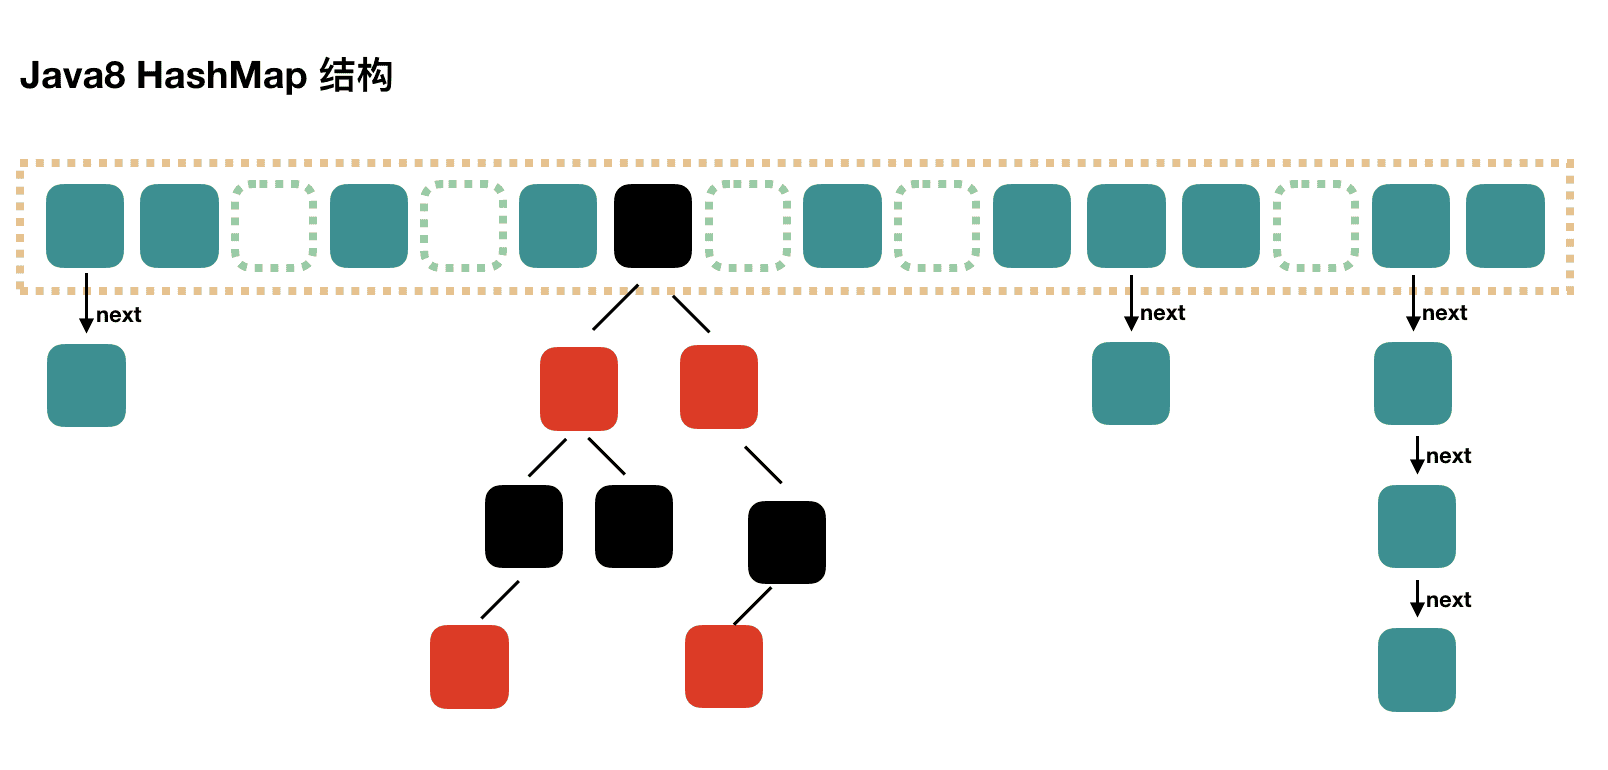
注意,上图是示意图,主要是描述结构,不会达到这个状态的,因为这么多数据的时候早就扩容了。
下面,我们还是用代码来介绍吧,个人感觉,Java8 的源码可读性要差一些,不过精简一些。
Java7 中使用 Entry 来代表每个 HashMap 中的数据节点,Java8 中使用 Node,基本没有区别,都是 key,value,hash 和 next 这四个属性,不过,Node 只能用于链表的情况,红黑树的情况需要使用 TreeNode。
我们根据数组元素中,第一个节点数据类型是 Node 还是 TreeNode 来判断该位置下是链表还是红黑树的。
# put 过程分析
和 Java7 稍微有点不一样的地方就是,Java7 是先扩容后插入新值的,Java8 先插值再扩容,不过这个不重要。
public V put(K key, V value) {
    return putVal(hash(key), key, value, false, true);
}

// 第四个参数 onlyIfAbsent 如果是 true,那么只有在不存在该 key 时才会进行 put 操作
// 第五个参数 evict 我们这里不关心
final V putVal(int hash, K key, V value, boolean onlyIfAbsent,
               boolean evict) {
    Node<K,V>[] tab; Node<K,V> p; int n, i;
    // 第一次 put 值的时候,会触发下面的 resize(),类似 java7 的第一次 put 也要初始化数组长度
    // 第一次 resize 和后续的扩容有些不一样,因为这次是数组从 null 初始化到默认的 16 或自定义的初始容量
    if ((tab = table) == null || (n = tab.length) == 0)
        n = (tab = resize()).length;
    // 找到具体的数组下标,如果此位置没有值,那么直接初始化一下 Node 并放置在这个位置就可以了
    if ((p = tab[i = (n - 1) & hash]) == null)
        tab[i] = newNode(hash, key, value, null);

    else {// 数组该位置有数据
        Node<K,V> e; K k;
        // 首先,判断该位置的第一个数据和我们要插入的数据,key 是不是"相等",如果是,取出这个节点
        if (p.hash == hash &&
            ((k = p.key) == key || (key != null && key.equals(k))))
            e = p;
        // 如果该节点是代表红黑树的节点,调用红黑树的插值方法,本文不展开说红黑树
        else if (p instanceof TreeNode)
            e = ((TreeNode<K,V>)p).putTreeVal(this, tab, hash, key, value);
        else {
            // 到这里,说明数组该位置上是一个链表
            for (int binCount = 0; ; ++binCount) {
                // 插入到链表的最后面(Java7 是插入到链表的最前面)
                if ((e = p.next) == null) {
                    p.next = newNode(hash, key, value, null);
                    // TREEIFY_THRESHOLD 为 8,所以,如果新插入的值是链表中的第 8 个
                    // 会触发下面的 treeifyBin,也就是将链表转换为红黑树
                    if (binCount >= TREEIFY_THRESHOLD - 1) // -1 for 1st
                        treeifyBin(tab, hash);
                    break;
                }
                // 如果在该链表中找到了"相等"的 key(== 或 equals)
                if (e.hash == hash &&
                    ((k = e.key) == key || (key != null && key.equals(k))))
                    // 此时 break,那么 e 为链表中[与要插入的新值的 key "相等"]的 node
                    break;
                p = e;
            }
        }
        // e!=null 说明存在旧值的key与要插入的key"相等"
        // 对于我们分析的put操作,下面这个 if 其实就是进行 "值覆盖",然后返回旧值
        if (e != null) {
            V oldValue = e.value;
            if (!onlyIfAbsent || oldValue == null)
                e.value = value;
            afterNodeAccess(e);
            return oldValue;
        }
    }
    ++modCount;
    // 如果 HashMap 由于新插入这个值导致 size 已经超过了阈值,需要进行扩容
    if (++size > threshold)
        resize();
    afterNodeInsertion(evict);
    return null;
}
2
3
4
5
6
7
8
9
10
11
12
13
14
15
16
17
18
19
20
21
22
23
24
25
26
27
28
29
30
31
32
33
34
35
36
37
38
39
40
41
42
43
44
45
46
47
48
49
50
51
52
53
54
55
56
57
58
59
60
61
62
63
2
3
4
5
6
7
8
9
10
11
12
13
14
15
16
17
18
19
20
21
22
23
24
25
26
27
28
29
30
31
32
33
34
35
36
37
38
39
40
41
42
43
44
45
46
47
48
49
50
51
52
53
54
55
56
57
58
59
60
61
62
63
# 数组扩容
resize() 方法用于初始化数组或数组扩容,每次扩容后,容量为原来的 2 倍,并进行数据迁移。
final Node<K,V>[] resize() {
    Node<K,V>[] oldTab = table;
    int oldCap = (oldTab == null) ? 0 : oldTab.length;
    int oldThr = threshold;
    int newCap, newThr = 0;
    if (oldCap > 0) { // 对应数组扩容
        if (oldCap >= MAXIMUM_CAPACITY) {
            threshold = Integer.MAX_VALUE;
            return oldTab;
        }
        // 将数组大小扩大一倍
        else if ((newCap = oldCap << 1) < MAXIMUM_CAPACITY &&
                 oldCap >= DEFAULT_INITIAL_CAPACITY)
            // 将阈值扩大一倍
            newThr = oldThr << 1; // double threshold
    }
    else if (oldThr > 0) // 对应使用 new HashMap(int initialCapacity) 初始化后,第一次 put 的时候
        newCap = oldThr;
    else {// 对应使用 new HashMap() 初始化后,第一次 put 的时候
        newCap = DEFAULT_INITIAL_CAPACITY;
        newThr = (int)(DEFAULT_LOAD_FACTOR * DEFAULT_INITIAL_CAPACITY);
    }

    if (newThr == 0) {
        float ft = (float)newCap * loadFactor;
        newThr = (newCap < MAXIMUM_CAPACITY && ft < (float)MAXIMUM_CAPACITY ?
                  (int)ft : Integer.MAX_VALUE);
    }
    threshold = newThr;

    // 用新的数组大小初始化新的数组
    Node<K,V>[] newTab = (Node<K,V>[])new Node[newCap];
    table = newTab; // 如果是初始化数组,到这里就结束了,返回 newTab 即可

    if (oldTab != null) {
        // 开始遍历原数组,进行数据迁移。
        for (int j = 0; j < oldCap; ++j) {
            Node<K,V> e;
            if ((e = oldTab[j]) != null) {
                oldTab[j] = null;
                // 如果该数组位置上只有单个元素,那就简单了,简单迁移这个元素就可以了
                if (e.next == null)
                    newTab[e.hash & (newCap - 1)] = e;
                // 如果是红黑树,具体我们就不展开了
                else if (e instanceof TreeNode)
                    ((TreeNode<K,V>)e).split(this, newTab, j, oldCap);
                else {
                    // 这块是处理链表的情况,
                    // 需要将此链表拆成两个链表,放到新的数组中,并且保留原来的先后顺序
                    // loHead、loTail 对应一条链表,hiHead、hiTail 对应另一条链表,代码还是比较简单的
                    Node<K,V> loHead = null, loTail = null;
                    Node<K,V> hiHead = null, hiTail = null;
                    Node<K,V> next;
                    do {
                        next = e.next;
                        if ((e.hash & oldCap) == 0) {
                            if (loTail == null)
                                loHead = e;
                            else
                                loTail.next = e;
                            loTail = e;
                        }
                        else {
                            if (hiTail == null)
                                hiHead = e;
                            else
                                hiTail.next = e;
                            hiTail = e;
                        }
                    } while ((e = next) != null);
                    if (loTail != null) {
                        loTail.next = null;
                        // 第一条链表
                        newTab[j] = loHead;
                    }
                    if (hiTail != null) {
                        hiTail.next = null;
                        // 第二条链表的新的位置是 j + oldCap,这个很好理解
                        newTab[j + oldCap] = hiHead;
                    }
                }
            }
        }
    }
    return newTab;
}
2
3
4
5
6
7
8
9
10
11
12
13
14
15
16
17
18
19
20
21
22
23
24
25
26
27
28
29
30
31
32
33
34
35
36
37
38
39
40
41
42
43
44
45
46
47
48
49
50
51
52
53
54
55
56
57
58
59
60
61
62
63
64
65
66
67
68
69
70
71
72
73
74
75
76
77
78
79
80
81
82
83
84
85
86
2
3
4
5
6
7
8
9
10
11
12
13
14
15
16
17
18
19
20
21
22
23
24
25
26
27
28
29
30
31
32
33
34
35
36
37
38
39
40
41
42
43
44
45
46
47
48
49
50
51
52
53
54
55
56
57
58
59
60
61
62
63
64
65
66
67
68
69
70
71
72
73
74
75
76
77
78
79
80
81
82
83
84
85
86
# get 过程分析
相对于 put 来说,get 真的太简单了。
- 计算
key的hash值,根据hash值找到对应数组下标:hash & (length-1) - 判断数组该位置处的元素是否刚好就是我们要找的,如果不是,走第三步
- 判断该元素类型是否是
TreeNode,如果是,用红黑树的方法取数据,如果不是,走第四步 - 遍历链表,直到找到相等(
==或equals)的key
public V get(Object key) {
    Node<K,V> e;
    return (e = getNode(hash(key), key)) == null ? null : e.value;
}
final Node<K,V> getNode(int hash, Object key) {
    Node<K,V>[] tab; Node<K,V> first, e; int n; K k;
    if ((tab = table) != null && (n = tab.length) > 0 &&
        (first = tab[(n - 1) & hash]) != null) {
        // 判断第一个节点是不是就是需要的
        if (first.hash == hash && // always check first node
            ((k = first.key) == key || (key != null && key.equals(k))))
            return first;
        if ((e = first.next) != null) {
            // 判断是否是红黑树
            if (first instanceof TreeNode)
                return ((TreeNode<K,V>)first).getTreeNode(hash, key);

            // 链表遍历
            do {
                if (e.hash == hash &&
                    ((k = e.key) == key || (key != null && key.equals(k))))
                    return e;
            } while ((e = e.next) != null);
        }
    }
    return null;
}
2
3
4
5
6
7
8
9
10
11
12
13
14
15
16
17
18
19
20
21
22
23
24
25
26
27
2
3
4
5
6
7
8
9
10
11
12
13
14
15
16
17
18
19
20
21
22
23
24
25
26
27
# HashSet
前面已经说过HashSet是对HashMap的简单包装,对HashSet的函数调用都会转换成合适的HashMap方法,因此HashSet的实现非常简单,只有不到300行代码。这里不再赘述。
//HashSet是对HashMap的简单包装
public class HashSet<E>
{
	......
	private transient HashMap<E,Object> map;//HashSet里面有一个HashMap
    // Dummy value to associate with an Object in the backing Map
    private static final Object PRESENT = new Object();
    public HashSet() {
        map = new HashMap<>();
    }
    ......
    public boolean add(E e) {//简单的方法转换
        return map.put(e, PRESENT)==null;
    }
    ......
}
2
3
4
5
6
7
8
9
10
11
12
13
14
15
16
2
3
4
5
6
7
8
9
10
11
12
13
14
15
16
# LinkedHashSet & Map
# 总体介绍
如果你已看过前面关于HashSet和HashMap,以及TreeSet和TreeMap的讲解,一定能够想到本文将要讲解的LinkedHashSet和LinkedHashMap其实也是一回事。LinkedHashSet和LinkedHashMap在Java里也有着相同的实现,前者仅仅是对后者做了一层包装,也就是说**LinkedHashSet**里面有一个**LinkedHashMap**(适配器模式)。因此本文将重点分析LinkedHashMap。
LinkedHashMap实现了Map接口,即允许放入**key**为**null**的元素,也允许插入**value**为**null**的元素。
从名字上可以看出该容器是linked list和HashMap的混合体,也就是说它同时满足HashMap和linked list的某些特性。可将**LinkedHashMap**看作采用**linked list**增强的**HashMap**。
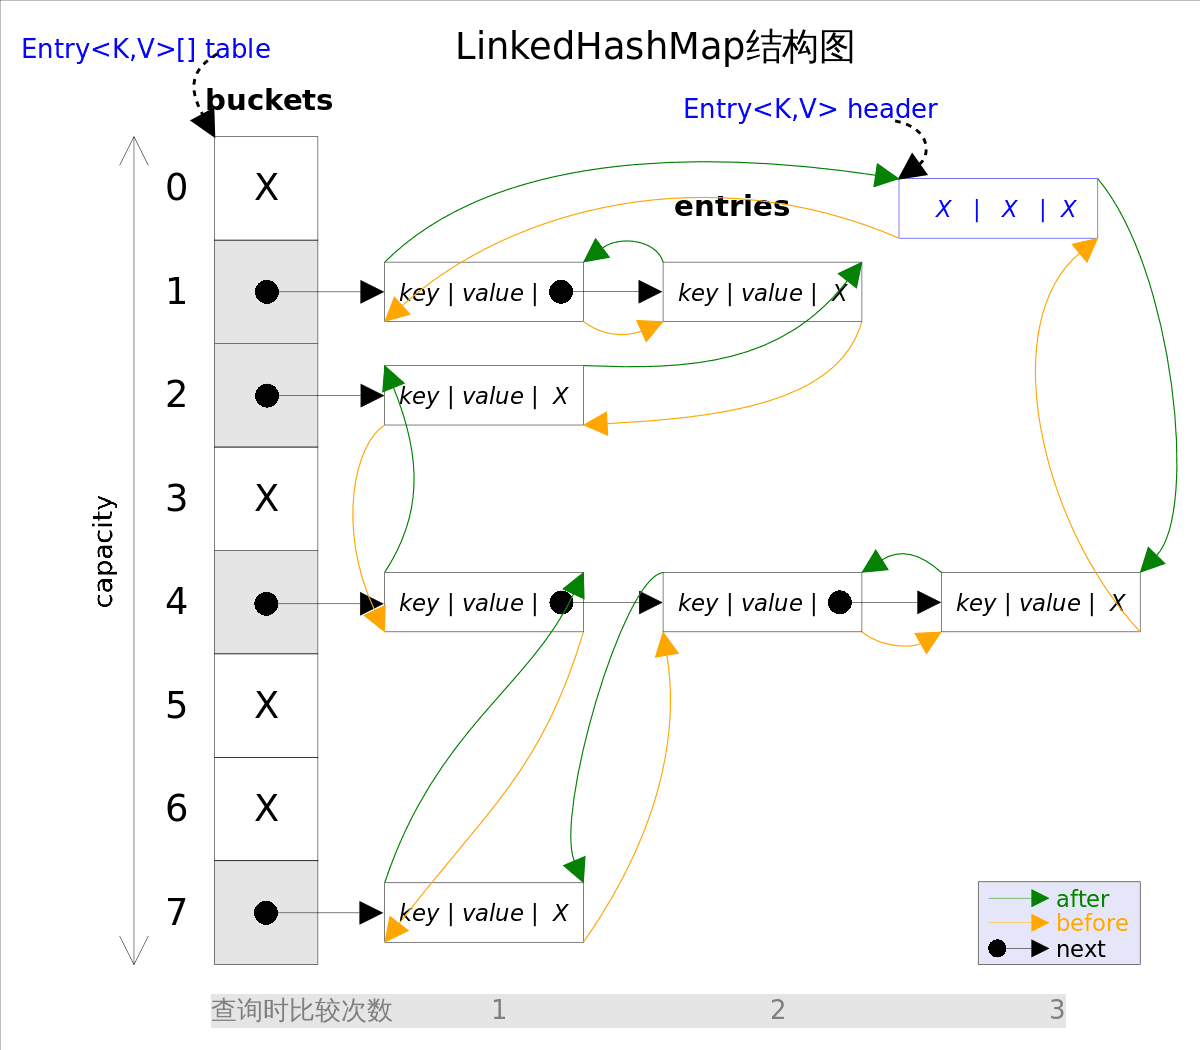
事实上LinkedHashMap是HashMap的直接子类,二者唯一的区别是**LinkedHashMap**在**HashMap**的基础上,采用双向链表(doubly-linked list)的形式将所有**entry**连接起来,这样是为保证元素的迭代顺序跟插入顺序相同。
上图给出了LinkedHashMap的结构图,主体部分跟HashMap完全一样,多了header指向双向链表的头部(是一个哑元),该双向链表的迭代顺序就是**entry**的插入顺序。
除了可以保迭代历顺序,这种结构还有一个好处 : 迭代**LinkedHashMap**时不需要像**HashMap**那样遍历整个**table**,而只需要直接遍历**header**指向的双向链表即可,也就是说LinkedHashMap的迭代时间就只跟entry的个数相关,而跟table的大小无关。
有两个参数可以影响LinkedHashMap的性能:_初始容量(inital capacity) _和 负载系数(load factor)。初始容量指定了初始table的大小,负载系数用来指定自动扩容的临界值。当entry的数量超过capacity*load_factor时,容器将自动扩容并重新哈希。对于插入元素较多的场景,将初始容量设大可以减少重新哈希的次数。
将对象放入到LinkedHashMap或LinkedHashSet中时,有两个方法需要特别关心: hashCode()和equals()。**hashCode()**方法决定了对象会被放到哪个bucket里,当多个对象的哈希值冲突时,**equals()**方法决定了这些对象是否是“同一个对象”。所以,如果要将自定义的对象放入到LinkedHashMap或LinkedHashSet中,需要@Override hashCode()和equals()方法。
通过如下方式可以得到一个跟源Map迭代顺序一样的LinkedHashMap:
void foo(Map m) {
    Map copy = new LinkedHashMap(m);
    ...
}
2
3
4
2
3
4
出于性能原因,LinkedHashMap是 非同步的(not synchronized),如果需要在多线程环境使用,需要程序员手动同步;或者通过如下方式将LinkedHashMap_包装成(wrapped) _同步的:
Map m = Collections.synchronizedMap(new LinkedHashMap(...));
# 方法剖析
# get()
get(Object key)方法根据指定的key值返回对应的value。该方法跟HashMap.get()方法的流程几乎完全一样,读者可自行参考前文,这里不再赘述。
# put()
put(K key, V value)方法是将指定的key, value对添加到map里。该方法首先会对map做一次查找,看是否包含该元组,如果已经包含则直接返回,查找过程类似于get()方法;如果没有找到,则会通过addEntry(int hash, K key, V value, int bucketIndex)方法插入新的entry。
注意,这里的插入有两重含义:
- 从
table的角度看,新的entry需要插入到对应的bucket里,当有哈希冲突时,采用头插法将新的entry插入到冲突链表的头部。 - 从
header的角度看,新的entry需要插入到双向链表的尾部。
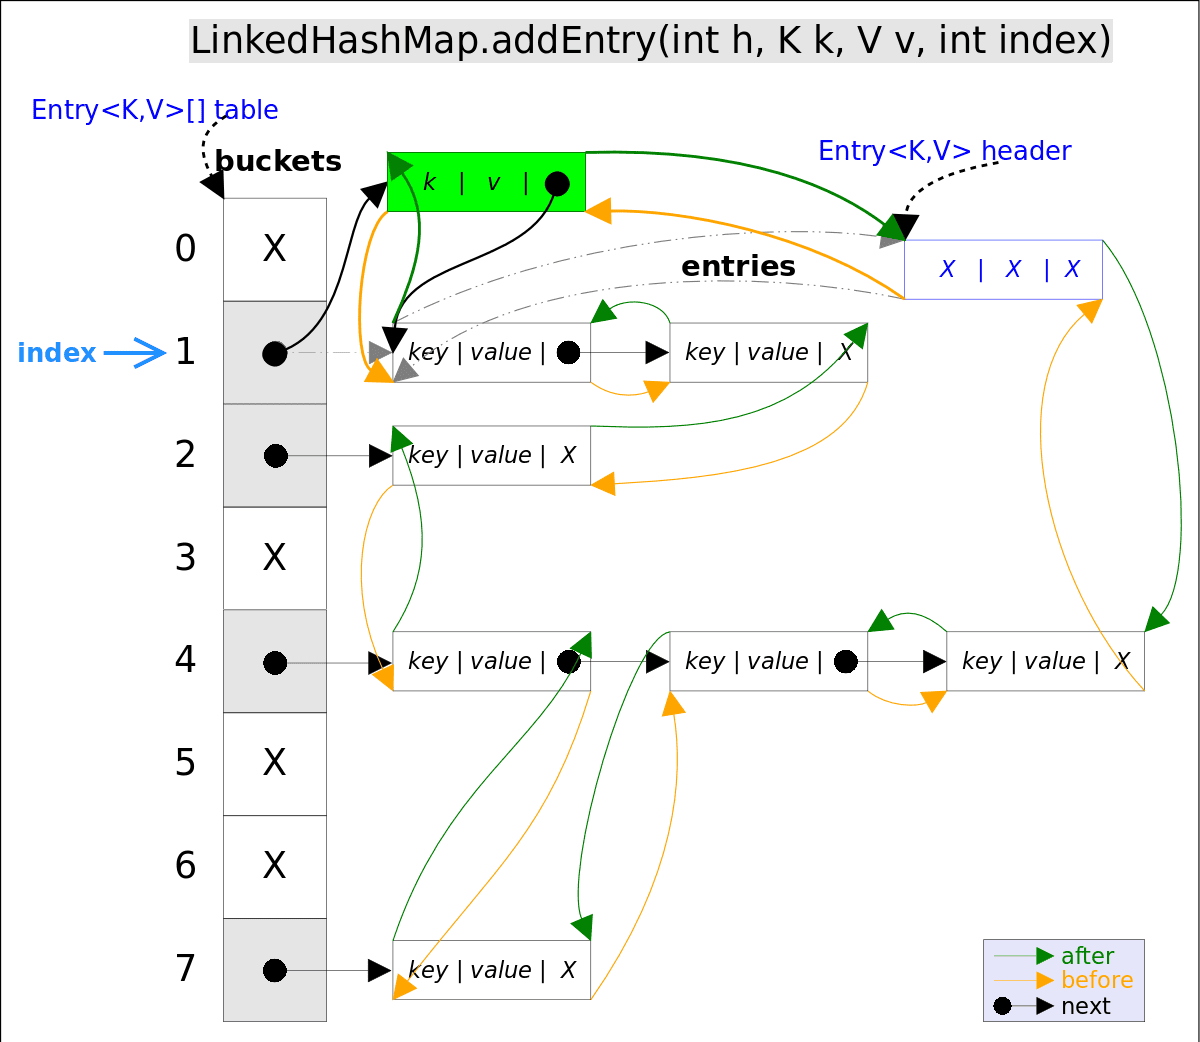
addEntry()代码如下:
// LinkedHashMap.addEntry()
void addEntry(int hash, K key, V value, int bucketIndex) {
    if ((size >= threshold) && (null != table[bucketIndex])) {
        resize(2 * table.length);// 自动扩容,并重新哈希
        hash = (null != key) ? hash(key) : 0;
        bucketIndex = hash & (table.length-1);// hash%table.length
    }
    // 1.在冲突链表头部插入新的entry
    HashMap.Entry<K,V> old = table[bucketIndex];
    Entry<K,V> e = new Entry<>(hash, key, value, old);
    table[bucketIndex] = e;
    // 2.在双向链表的尾部插入新的entry
    e.addBefore(header);
    size++;
}
2
3
4
5
6
7
8
9
10
11
12
13
14
15
2
3
4
5
6
7
8
9
10
11
12
13
14
15
上述代码中用到了addBefore()方法将新entry e插入到双向链表头引用header的前面,这样e就成为双向链表中的最后一个元素。addBefore()的代码如下:
// LinkedHashMap.Entry.addBefor(),将this插入到existingEntry的前面
private void addBefore(Entry<K,V> existingEntry) {
    after  = existingEntry;
    before = existingEntry.before;
    before.after = this;
    after.before = this;
}
2
3
4
5
6
7
2
3
4
5
6
7
上述代码只是简单修改相关entry的引用而已。
# remove()
remove(Object key)的作用是删除key值对应的entry,该方法的具体逻辑是在removeEntryForKey(Object key)里实现的。removeEntryForKey()方法会首先找到key值对应的entry,然后删除该entry(修改链表的相应引用)。查找过程跟get()方法类似。
注意,这里的删除也有两重含义:
- 从
table的角度看,需要将该entry从对应的bucket里删除,如果对应的冲突链表不空,需要修改冲突链表的相应引用。 - 从
header的角度来看,需要将该entry从双向链表中删除,同时修改链表中前面以及后面元素的相应引用。
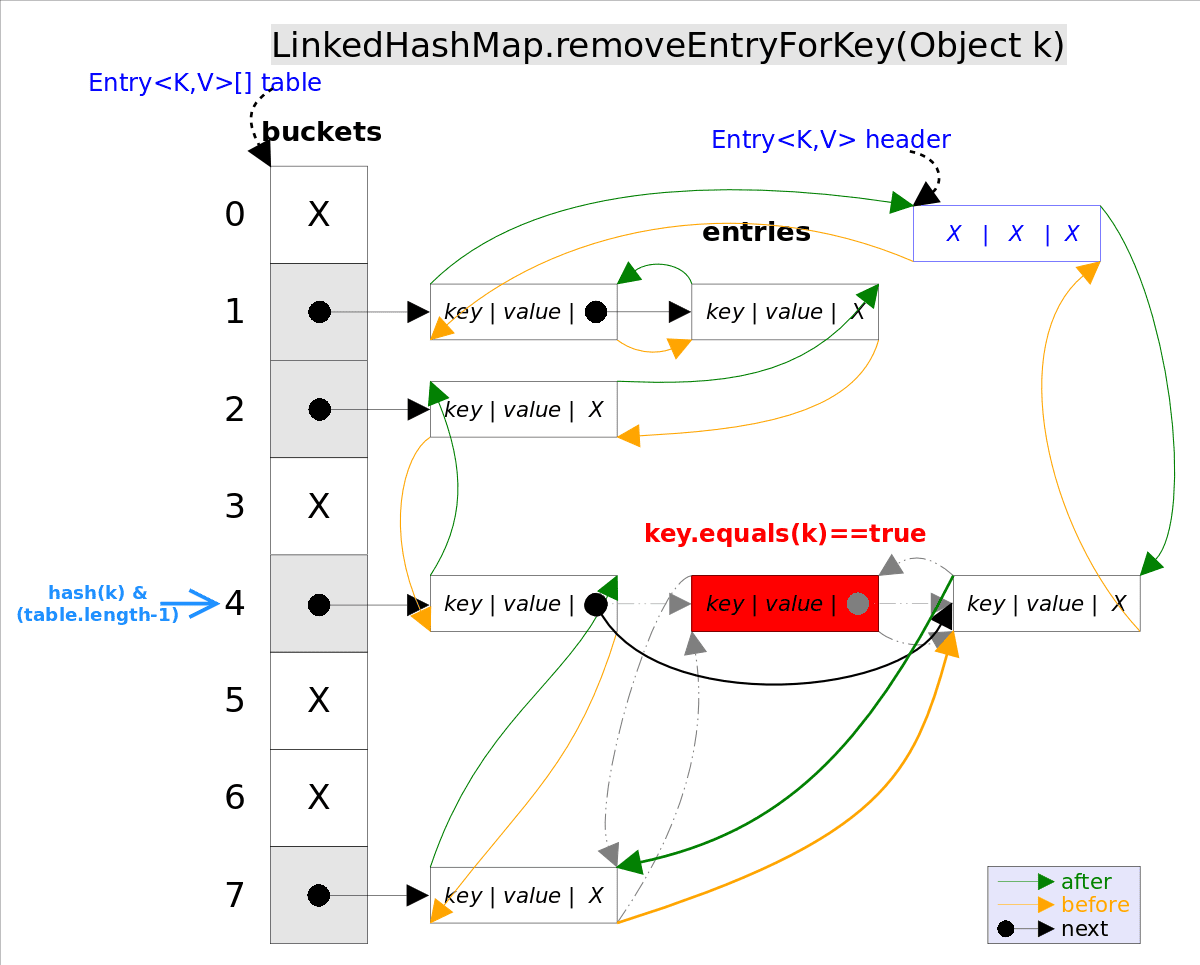
removeEntryForKey()对应的代码如下:
// LinkedHashMap.removeEntryForKey(),删除key值对应的entry
final Entry<K,V> removeEntryForKey(Object key) {
	......
	int hash = (key == null) ? 0 : hash(key);
    int i = indexFor(hash, table.length);// hash&(table.length-1)
    Entry<K,V> prev = table[i];// 得到冲突链表
    Entry<K,V> e = prev;
    while (e != null) {// 遍历冲突链表
        Entry<K,V> next = e.next;
        Object k;
        if (e.hash == hash &&
            ((k = e.key) == key || (key != null && key.equals(k)))) {// 找到要删除的entry
            modCount++; size--;
            // 1. 将e从对应bucket的冲突链表中删除
            if (prev == e) table[i] = next;
            else prev.next = next;
            // 2. 将e从双向链表中删除
            e.before.after = e.after;
            e.after.before = e.before;
            return e;
        }
        prev = e; e = next;
    }
    return e;
}
2
3
4
5
6
7
8
9
10
11
12
13
14
15
16
17
18
19
20
21
22
23
24
25
2
3
4
5
6
7
8
9
10
11
12
13
14
15
16
17
18
19
20
21
22
23
24
25
# LinkedHashSet
前面已经说过LinkedHashSet是对LinkedHashMap的简单包装,对LinkedHashSet的函数调用都会转换成合适的LinkedHashMap方法,因此LinkedHashSet的实现非常简单,这里不再赘述。
public class LinkedHashSet<E>
    extends HashSet<E>
    implements Set<E>, Cloneable, java.io.Serializable {
    ......
    // LinkedHashSet里面有一个LinkedHashMap
    public LinkedHashSet(int initialCapacity, float loadFactor) {
        map = new LinkedHashMap<>(initialCapacity, loadFactor);
    }
	......
    public boolean add(E e) {//简单的方法转换
        return map.put(e, PRESENT)==null;
    }
    ......
}
2
3
4
5
6
7
8
9
10
11
12
13
14
2
3
4
5
6
7
8
9
10
11
12
13
14
# LinkedHashMap经典用法
LinkedHashMap除了可以保证迭代顺序外,还有一个非常有用的用法:可以轻松实现一个采用了**FIFO**替换策略的缓存。具体说来,LinkedHashMap有一个子类方法protected boolean removeEldestEntry(Map.Entry<K,V> eldest),该方法的作用是告诉Map是否要删除“最老”的Entry,所谓最老就是当前Map中最早插入的Entry,如果该方法返回true,最老的那个元素就会被删除。在每次插入新元素的之后LinkedHashMap会自动询问removeEldestEntry()是否要删除最老的元素。这样只需要在子类中重载该方法,当元素个数超过一定数量时让removeEldestEntry()返回true,就能够实现一个固定大小的FIFO策略的缓存。示例代码如下:
/** 一个固定大小的FIFO替换策略的缓存 */
class FIFOCache<K, V> extends LinkedHashMap<K, V>{
    private final int cacheSize;
    public FIFOCache(int cacheSize){
        this.cacheSize = cacheSize;
    }

    // 当Entry个数超过cacheSize时,删除最老的Entry
    @Override
    protected boolean removeEldestEntry(Map.Entry<K,V> eldest) {
       return size() > cacheSize;
    }
}
2
3
4
5
6
7
8
9
10
11
12
13
2
3
4
5
6
7
8
9
10
11
12
13
